
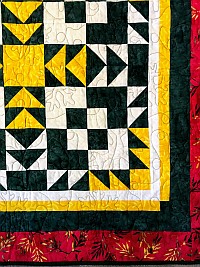
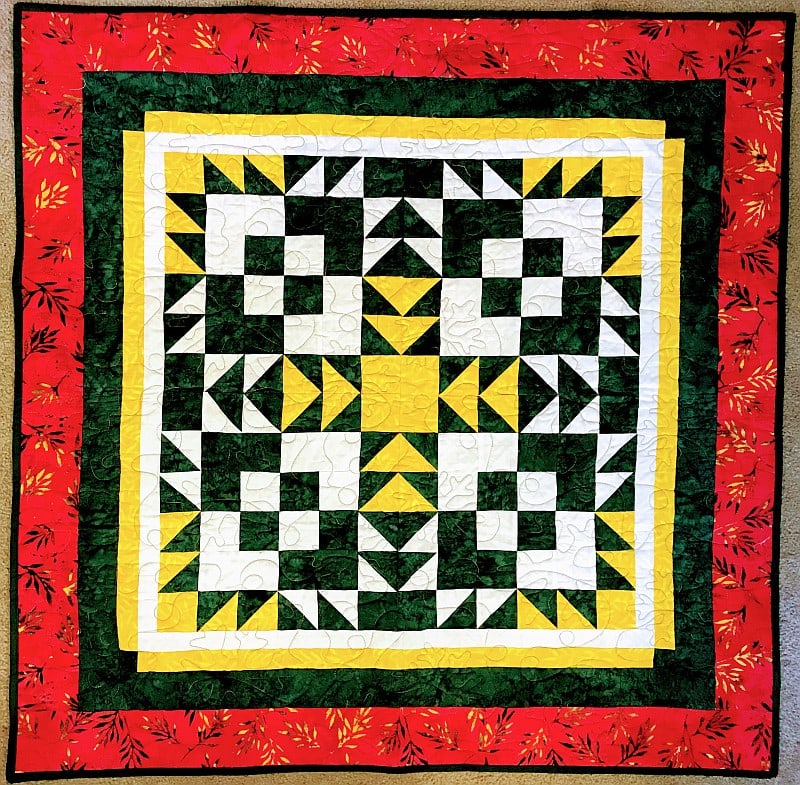
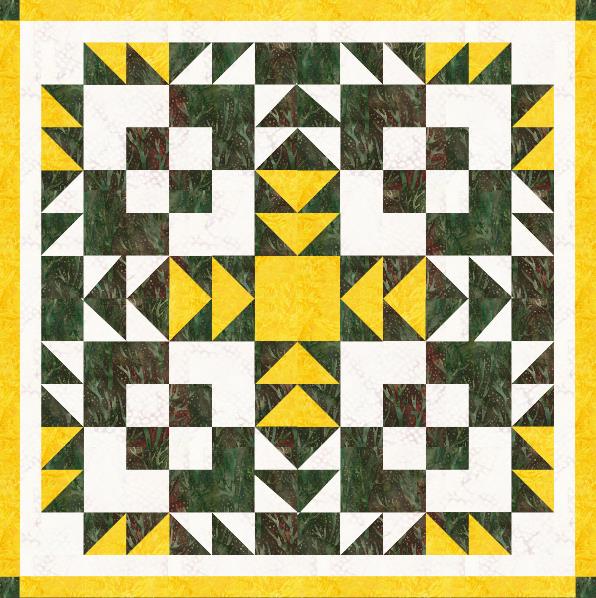
With life as crazy as it has been lately, I appreciated the offer to show an older Christmas project in a Blog Hop. This red, green, and gold lap quilt or wallhanging was a variation on a pattern I did in 2012. This free tutorial will show you how it is made using the traditional method of making Half-Square-Triangle Quilt Blocks.
Before beginning this or any other project, wash and press your fabric. If you like the behavior of crisp fabric as you cut, sew, and press your project, try a little Best Press when you iron it. Take the time to clean your machine a, put in a new needle, and fill a few bobbins. It will save you time later.
Unless the pattern tells you otherwise, you should always assume that the seam in any quilting pattern is 1/4” wide. All strips are cut by with Width of Fabric (WOF.) Read through the pattern first and cross off the pattern colors and write in yours if you change them.
This quilt pattern uses the traditional method of making Half-Square-Triangles. (HSTs) If you prefer the Magic Eight method, adjust the cutting instructions accordingly. You will need (1) 6″ square of each color to make (8) HSTs instead of the (4) 3″ squares that you would use with the traditional method.
Fabric Requirements for this Christmas Quilt
Color-One 1 yard for the blocks and second border. (Dark green in the quilt)
- Cut (3) strips 3″ wide by the WOF. Cut these strips into (32) 3″ x 3″ squares.
- Cut (10) strips 2-1/2″ wide by the WOF. Cut these strips into (2) 2-1/2″ x 28-1/2″ rectangles and (2) 2-1/2″ x 32-1/2″ rectangles for the second border; (8) 4-1/2″ x 2-1/2″ rectangles; (24) 2-1/2″ x 2-1/2″ squares and (4) 1-1/2″ x 1-1/2″ squares. The leftover strips can be used for binding.
Color-Two 1/2 yard (ivory background in quilt)
- Cut (2) strips 3″ wide by the WOF. Cut each of strips into 26-1/2″ long rectangles. Cut both 26-1/2″ wide strips in half the long way to make (4) 1-1/2″ x 26-1/2″ rectangles for use in the first border. Cut (2) of these border strips to a 24-1/2″ length.
- Cut (4) strips 3″ wide by the WOF. From those strips, cut (36) 3″ x 3″ squares and (4) 2-1/2″ x 4-1/2″ rectangles.
Color-Three 1/2 yard (gold background in quilt)
- Cut (2) strips 3″ wide by the WOF. Cut (2) strips 26-1/2″ long. Use the remaining strip to cut (4) 2-1/2″ x 2-1/2″ squares. Cut the 26-1/2″ wide strips in half the long way to make (4) 1-1/2″ x 26-1/2″ rectangles for use in the second border.
- Cut (2) strips 3″ wide by the WOF. From those strips, cut (16) 3″ x 3″ squares.
Outer Border Print 1/2 yard (red in the quilt)
- Cut (4) 3-1/2″ wide strips by the WOF. Cut these strips into (2) 3-1/2″ x 32-1/2″ rectangles and (2) 3-1/2″ x 38-1/2″ rectangles
Things You Will Find Helpful
- A 6-1/2″ and a 12-1/2″ Square Ruler
- Rotary Cutter and Sharp Blade
- A mat that rotates
- A Walking Foot
- Spray Starch
Making the Half Square Triangles (HSTs)
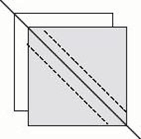
Start by making the Color One and Color Two HSTs for this project. Place a Color One 3″ x 3″ square and a Color Two 3″ x 3″ square right sides together. Draw a diagonal line on the back of the Color Two square. Sew 1/4″ on either side of this line. Cut on the line. Press to the dark and square up to 2-1/2″ x 2-1/2″. Make 16 HSTs.
Using this same method, make (32) Color One and Color Three HSTs. Press to the dark and square up to 2-1/2″ x 2-1/2″.
Making the Block
There are four 12-1/2″ (unfinished) blocks in this quilt, each made of four
6-1/2″ blocks. These are the 6-1/2″ square blocks that you will need to make:
For EACH block, Assemble:
- (1) Color One 2-1/2″ square
- (1) Color Two 2-1/2″ square
- (1) Color Three 2-1/2″ square
- (1) Color Two 2-1/2″ x 4-1/2″ rectangle
- (4) Color One/Three HST blocks
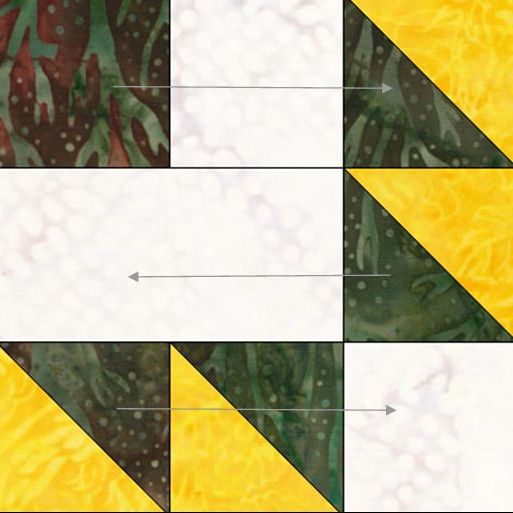
For EACH block, Assemble:
- (2) Color One 2-1/2″ squares
- (1) Color Two 2-1/2″ square
- (1) Color One 2-1/2″ x 4-1/2″ rectangle
- (4) Color One/Two HST blocks
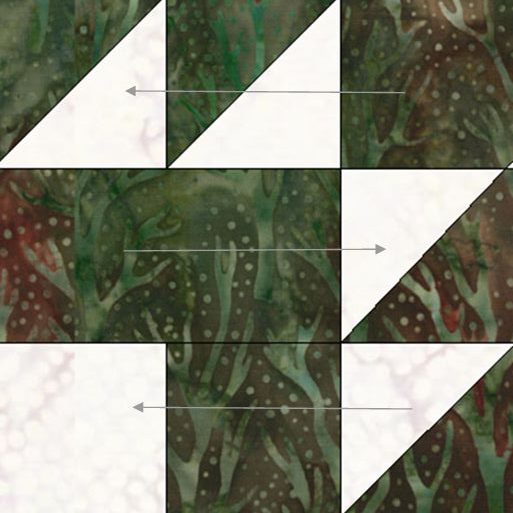
For EACH Block Assemble:
- (1) Color One 2-1/2″ square
- (2) Color Two 2-1/2″ squares
- (1) Color Two 2-1/2″ x 4-1/2″ rectangle
- (4) Color One/Three HST blocks
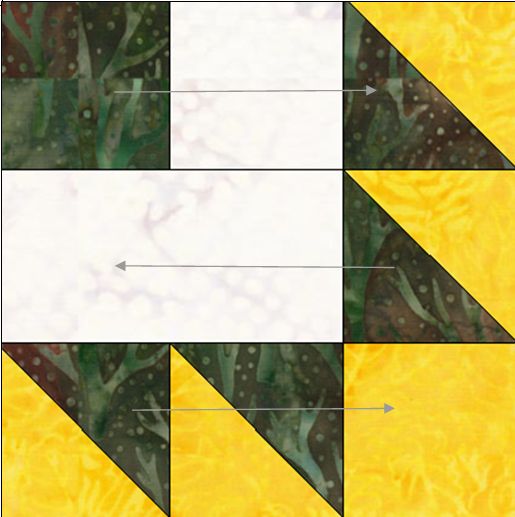
Sew each block as shown above. Press as directed by the arrows and square up to 6-1/2″ if necessary.
Sort the small blocks into piles of four. Sew them together as shown below. Because of the way you pressed your seams, they should alternate at the intersections. Use pins to encourage this behavior.
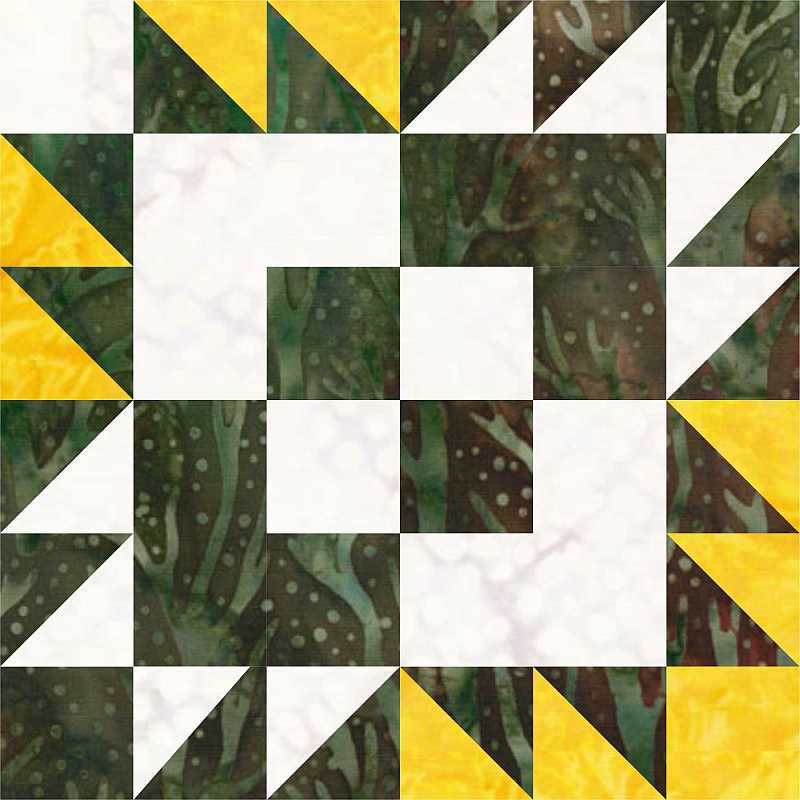
You are almost done! You now have four 12-1/2″ blocks. Sew them in a group of four with the all-yellow sides in the center.
Adding the Borders
Sew (2) 1-1/2″ x 24-1/2″ Color Two rectangles to both sides of the top you just made. Press to the rectangle. Sew (2) 1-1/2″ x 26-1/2″ Color Two rectangles to the top and bottom. Press. Forcing a quilt top to match two identically cut borders helps it to remain flat.
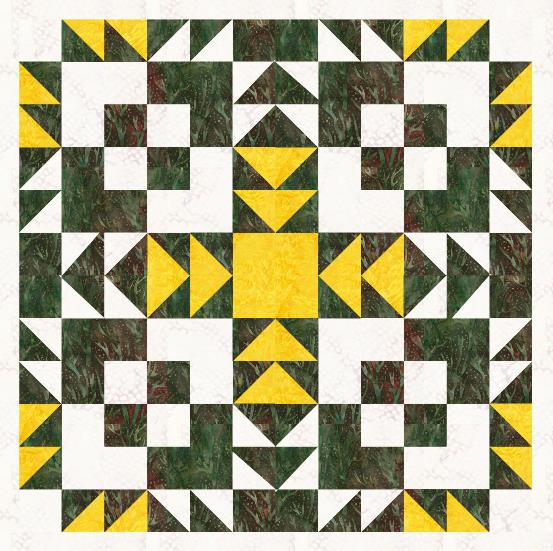
Sew a 1-1/2″ x 26-1/2″ Color Three rectangle to the top and bottom of the top you just made. Press to the rectangle. Sew a 1-1/2″ x 1-1/2″ Color One square to both ends of the remaining (2) 1-1/2″ x 26-1/2″ Color Three rectangles. Sew these rectangles to both sides of the quilt top and press to the rectangle.
Sew a 2-1/2″ x 28-1/2″ Color One rectangle to the top and bottom of the top you just made. Press to the rectangle. Sew a 2-1/2″ x 32-1/2″ Color One rectangle to both sides of the quilt top.
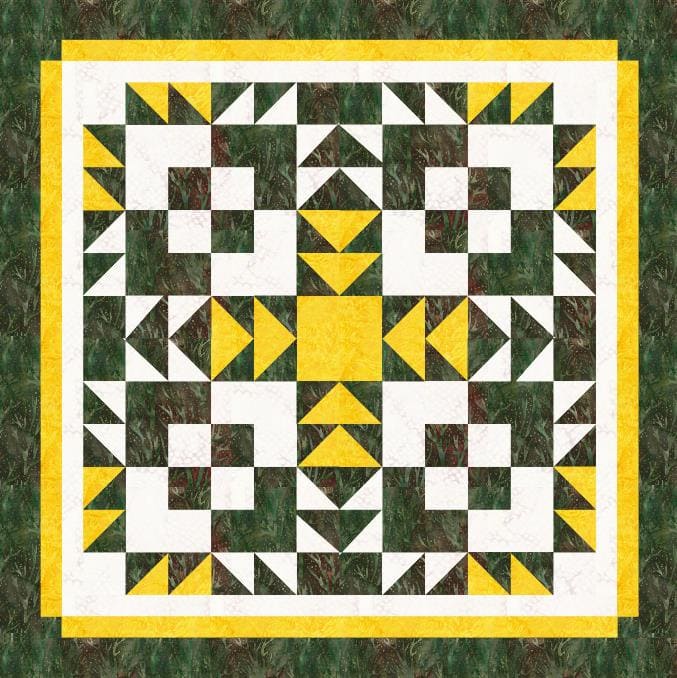
Sew a 3-1/2″ x 32-1/2″ Outer Border rectangle to both sides of the top. Press to the border. Sew the remaining 3-1/2″ x 38-1/2″ Outer Border rectangles to the top and bottom of the quilt top and… you are done! Enjoy!
Please add kris@scrapdash.com to your contacts list to make sure you get the confirmation message. Drag the confirmation message from the Promotion tab to the Primary tab if you use Gmail.
If you are already a subscriber, it’s okay to fill out this form. You won’t be put on the mailing list twice.
Have another tip to offer? Send it to me or reply below and I will add it here.
Don’t forget to sign up for the newsletter! Once a week, I send updates on quilt-related information I have found while wandering the web. This might be an inspiring article, a tip or tutorial I have discovered (or written), and occasionally exclusive offers & discounts as well as immediate access to the secret page of free patterns, guides, and printables. You can follow my page on Facebook, or join the Make Believe Quilters group, too.


Thanks for the tutorial for this sweet little holiday quilt.
Great tutorial for a super sweet quilt. Thank you!
What a great tutorial. Perfect for getting started on those holiday projects with! Thanks.
This is a really pretty quilt in nontraditional Christmas fabrics…I love that about it! Thank you for sharing your tutorial and tips to help make this beauty. I’m so glad you shared your “then” project with us. Thank you!
Great tutorial for a lovely quilt! Thanks so much for sharing!
Really like the design! Thanks for sharing the tutorial.
Beautiful quilt! Thank you for the pattern and tutorial.
Thank you for sharing the details of your pretty quilt.
Thank you for sharing the details of your pretty quilt.
Thanks for sharing!
Great tutorial and quilt! I just love green, red and gold together at Christmas time – classic colors! Thanks for sharing!
Very neat looking quilt. I love HST and the Magic Eight method is wonderul expecially if you need lots of them. You needed lots in this quilt. Perfect.
Thanks for the tutorial. Such a fun quilt.
You are so correct about starching the fabric before cutting and sewing. It really does make a difference!
Great tutorial! I hope to make more of those HST’s since I now have a cutting machine.
Thank you so much, Kris! This is super easy to follow. I already subscribe to the newsletters. =) I did a Print Friendly. I think when my accuquilt gift arrives from a friend who upgraded, I’m going to make this as an early project. So pretty in lots of colors!
Kris Thank you for sharing another great tutorial for a sweet little quilt!
What a nice Christmas quilt! Thanks for sharing the tutorial with us!
Very pretty and great tutoral
What a lovely tutorial, thank you!
What a pretty Christmas quilt! Thank you for sharing your tutorial.
Great quilt, thanks for the tutorial.