
There are two basic types of quilt binding, straight grain binding (which includes cross grain binding) and bias binding. Straight grain binding is binding that is cut in strips along the grain line of a piece of fabric parallel to the selvedge. Crossgrain binding is also cut in strips along the grain line but it is cut from selvedge to selvedge. Bias binding is binding that is cut at a 45 degree angle from the selvedge. For more details on the differences between the types of binding and how to choose which one to use, read Binding Basics at Phoebemoon.com.
Here is a list of other products you may find helpful for binding, from Amazon.

Here are some quilt binding tips:
- When sewing on binding, use fusible thread in the bobbin. Then you can fuse the binding to the back for a quick finish.
- When sewing on a binding, use your walking foot and lengthen your stitch for a really flat seam.
- Alexandra suggested sewing binding on to the the back of a quilt by machine then folding it over to the front and sewing it down with a fine zip zag stitch.
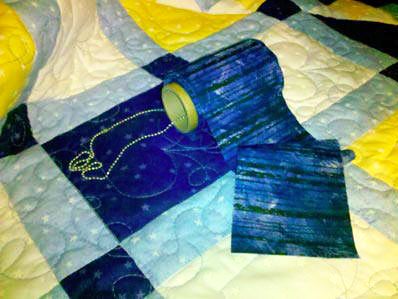
- Karen suggested that you wind your quilt binding around a toilet paper tube and let it feed from a deep jar while sewing it on. (Picture is from Designsbysick.)
- Sew your label into the seam that sews on the binding on a corner. This way, there are only two sides to hand sew and it is more difficult to for the label to be removed. Also, put your initials on the seam allowance of the binding. That way, if the quilt disappears and later reappears without the label, you can prove it is yours by simply undoing a few hand stitches.
- An over the door towel rack in your sewing room makes the perfect spot to hang cut strips, or binding sort by color and no wrinkles! (from Lucy)
- Linda suggested a scrappy binding for a scrappy quilt. Use those leftovers! Our patterns Skip to My Lou and Square Deal both have scrappy bindings.

- Here’s a tip for joining binding edges.
1. Start by cutting one end the width of the binding longer than the the other end. In my case, it was 2-1/2″.
2.Cross those two ends right sides together and draw a diagonal line. Sew on the diagonal line.
3. AFTER you have checked to make sure you did it correctly, cut a 1/4″ seam.
4. Your binding will fit perfectly on your top.
5. The Binding Miter Tool will help you finish this edge. (Amazon link)

There is a Binding Calcuator and an illustrated Bias Binding Tutorial at Phoebemoon.com. This extensive illustrated tutorial discusses not only three types of bindings and when they should be used but also six other edge finishes. Complete instructions are given for six different methods of making bias binding, including two for continuous bias binding. Yardage charts are included for each method.
In addition, this tutorial includes information on how to attach bias binding to your quilt, how to create mitered corners, and offers three different methods of joining the loose ends of the binding. A sneak peek is available here. You will also learn how to do a faux piped binding.

Here is a video you might find helpful:
Have another tip to offer? Send it to me or reply below and I will add it here.
Don’t forget to sign up for the newsletter! Once a week, I send updates on quilt-related information I have found while wandering the web. This might be an inspiring article, a tip or tutorial I have discovered (or written), and occasionally exclusive offers & discounts as well as immediate access to the secret page of free patterns, guides, and printables. You can follow my page on Facebook, or join the Make Believe Quilters group, too.

What a great video on how to do binding of quilt from Leah Day. Thanks Kris for sharing it.