
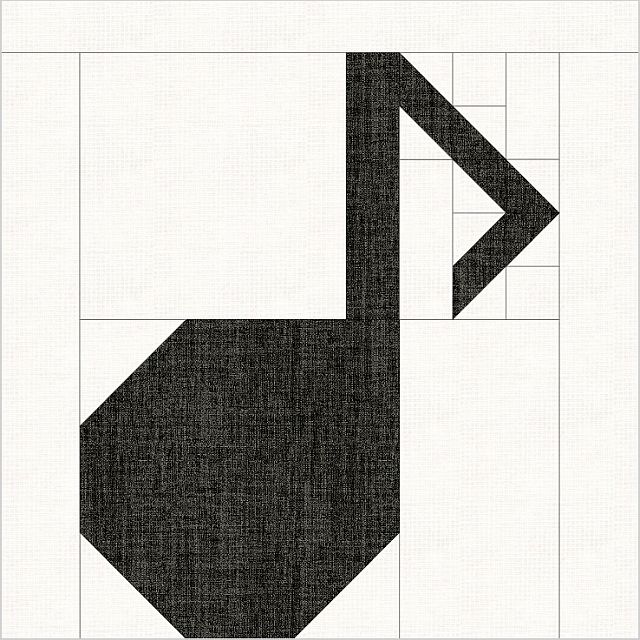
The theme of this blog hop is “It Moose Be Love”. I don’t particularly love moose, but I do love moose-ic! So here is a mooseic note quilt block that you can use in a table runner or quilt.
To visit the other designers in this hop, see the list at the bottom of the page. To print this page, use the green Print Friendly button at the bottom, just above the comments. If that doesn’t work, try pressing down the CNTRL button and the P button at the same time. Or the COMMAND button and the P button if you are on a Mac. That should bring up the printer dialog.

This is an 18″ block that is made in two major sections. It will be helpful if you have a 2-1/2″, 3-1/2″, and a 9-1/2″ ruler, but it isn’t necessary.
Fabric Requirements
White
- (1) 2″ x 18-1/2″ rectangle
- (2) 2-3/4″ x 17″ rectangles
- (1) 5″ x 9-1/2″ rectangle
- (1) 2″ x 3-1/2″ rectangle
- (1) 2″ x 5″ rectangle
- (3) 4″ squares
- (1) 8″ square
- (4) 2-1/2″ squares
- (2) 2″ squares
Black
- (1) 2″ x 8″ rectangle
- (1) 3-1/2″ x 9-1/2″ rectangle
- (2) 4″ squares
- (3) 3-1/2″ squares
- (8) 2-1/2″ squares
How to Create and Square Up a Half Square Triangle (HST) Quilt Block
The Traditional Method of making Half Square Triangle Blocks (HSTs) is to place two identical squares right sides together. These squares should be 7/8″ larger than the finished size of the final HST. Draw a diagonal line on the back of one square. Sew 1/4″ on both sides of the line. Cut on the line and press to the dark.

You will have made two identical Half Square Triangle (HST) blocks. My personal preference is to cut squares 1″ larger than the finished size of the final HST and square it up to the correct size after pressing.
There are two ways you can square up your block.
You can place a square ruler so the diagonal line is directly over the seam and just cut two sides. Quilt-in-a-Day has a Square Up Ruler that uses this method.
Or you can press open the block (pressing to the dark) and square it up using a ruler the same size as the block you are making. A fussy-cut ruler with lines on both diagonals will be very helpful with this.
Assemble:
- (2) 4″ black squares
- (2) 4″ white squares
Following the directions above, make (4) HSTs. You will only need (3) for this project. Press and square up to 3-1/2″.
Assemble:
- (4) 2-/12″ black squares
- (4) 2-1/2″ white squares
Following the directions above, make (8) HSTs. Press and square up to 2″.
Creating the Note
Making the left side of the block
Assemble:
- (3) 3-1/2″ HSTs
- (3) 3-1/2″ black squares
- (1) 3-1/2″ x 9-1/2″ black rectangle
- (1) 2″ x 8″ black rectangle
- (1) 8″ white square
- (1) 2-3/4″ x 17″ white rectangle
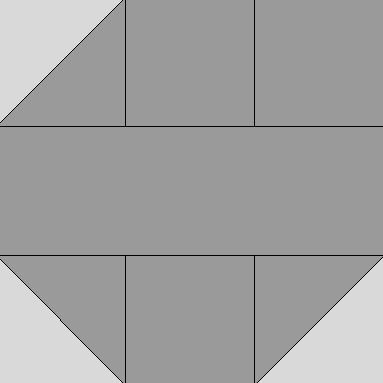
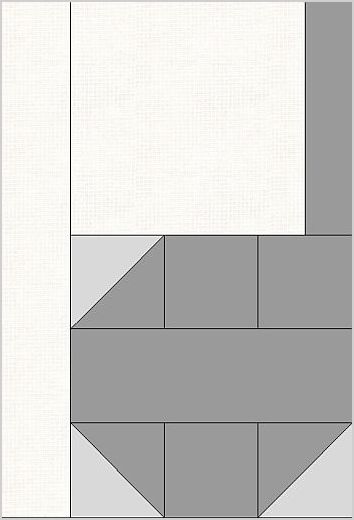
Sew these units in (3) rows as shown below. It doesn’t matter how you press the blocks seams, as long as you do. Square up this block to 9-1/2″ if necessary. This is the notehead.
Sew the 2″ x 8″ black rectangle to one side of the 8″ white square. Press to the dark. Sew this unit to the top of the note that you just made. Sew the 2-3/4″ x 17″ white rectangle to the right side of this block to make the stem of the notehead. Press to the rectangle. This is the left side of the note block. It should measure 11-3/4″ x 17″.
Making the right side of the block
Assemble:
- (8) 2″ HSTs
- (2) 2″ white squares
- (1) 2″ x 5″ white rectangle
- (1) 2″ x 3-1/2″ white rectangle
This is the trickiest part of the whole block. It is the flag, tail, or hook of the note. I suggest that you piece the top two rows first, then the bottom three rows. Sew the two row sections together, using pins at the intersections to keep everything straight. Press from the back so you can fix any twisted seams.
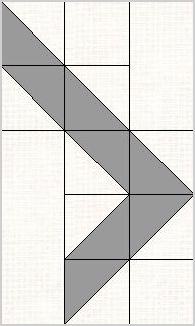
This section will measure 5″ x 8″.
Assemble:
- (1) 5″ x 9-1/2″ white rectangle
- (1) 2-3/4″ x 17″ white rectangle
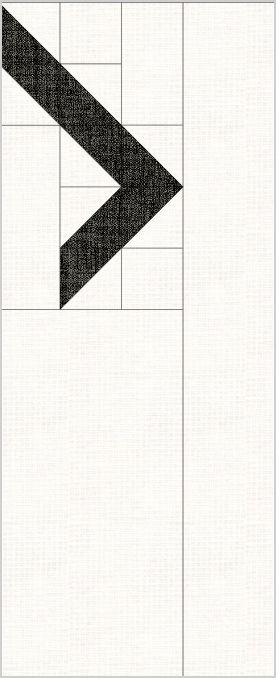
Sew the 5″ x 9-1/2″ white rectangle to the bottom of this block. Press to the rectangle. Sew the 2-3/4″ x 17″ white rectangle to the right side. Press to the rectangle. This section should measure 7-1/4″ x 17″.
Almost done!
Sew the two sections together, then sew the 2″ x 18-1/2″ rectangle to the top of the block. Press and admire!

Be Sure to Visit These Designers, Too!
Monday February 19
Tuesday February 20
Wednesday February 21
Thursday February 22
Have another tip to offer? Send it to me or reply below and I will add it here.
Don’t forget to sign up for the newsletter! Once a week, I send updates on quilt-related information I have found while wandering the web. This might be an inspiring article, a tip or tutorial I have discovered (or written), and occasionally exclusive offers & discounts as well as immediate access to the secret page of free patterns, guides, and printables. You can follow my page on Facebook, or join the Make Believe Quilters group, too.