It’s For the Birds – 3D Flying Geese Quilt Blocks
Note: This post may contain affiliate links. That means we may earn a commission at no additional cost to you if you purchase via our links. Not all links are affiliate links. I only recommend products I use and trust. As an Amazon Associate, I earn from qualifying purchases.
(Also known as Dimensional Flying Geese)
There is a pattern at the bottom of the page that is free to newsletters subscribers. If you would rather not subscribe, you can print this page by using the green Print Friendly button at the bottom, just above the comments. If that doesn’t work, try pressing down the CNTRL button and the P button at the same time. Or the COMMAND button and the P button if you are on a Mac. That should bring up the printer dialog.
How to Make A Three Dimensional Flying Goose Block
These pictures are taken from the Pumpkin Spice Latte Mystery. You can use whatever colors you like, of course.
Assemble:
(8) Red 3″ x 3″ squares
(8) Gold 3″ x 3″ squares
(16) Green 3″ x 3″ squares
(16) Background 3″ x 5-1/2″ rectangles

Place a 3″ x 3″ Green square right side up on your sewing table. Fold a Background rectangle wrong sides together and place it on top of the square, aligning the cut edges.

It will not cover the entire square because a 5-1/2″ long rectangle folded in half is only 2-3/4″ square. The fold should be about 1/4″ away from the top of the square.

Place a 3″ x 3″ Red square on top of the two pieces, right sides together, again aligning the cut edges. Your background square be the center of the sandwich. Using a 1/4″ seam, sew along the SIDE of the all layers as shown.


Open up your sandwich and lay the two sides flat. Your middle background piece will be free-standing. Gently pull both sides of the background piece to the edges of the two sides.
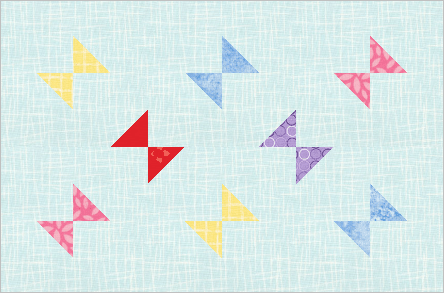
Do you see the 3D Flying Geese Quilt Block?
Stay stitch about 1/8″ from the edge, finger pressing the seams open.


My video is here: https://www.youtube.com/watch?v=DvXUvKIzYZY&t=66s
but I explain the other three dimensional elements first. If you would rather see JUST the one-seam dimensional elements, watch this video: https://www.youtube.com/watch?v=JWpJrZZrrjM and stop at the one-minute mark.
Here’s one I did for Mardi Gras last year:
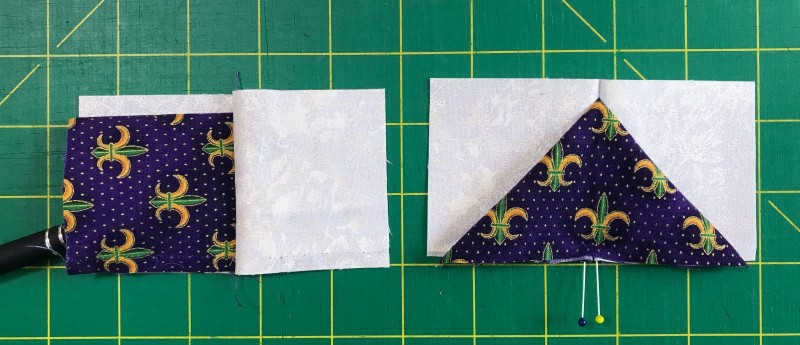
That tutorial, with a free Geese in Flight pattern is at https://scrapdash.com/mardi-gras-geese/
Please add moc.hsadparcs@sirk to your contacts list to make sure you get the confirmation message. Drag the confirmation message from the Promotion tab to the Primary tab if you use Gmail.
If you are already a subscriber, it’s okay to fill out this form. You won’t be put on the mailing list twice.


Very nice flying geese. Thank you for the tutorial. I never thought of using two different colors before.
I love making 3d flying geese.
Great tutorial – I have made some of these YEARS ago but had forgotten all about them – thank you!!
I have seen this method of making flying geese before but have forgotten it. Thanks for the turorial. Great job.
I think I’ll have to try some dimensional flying geese! Thanks for the tutorial!