Butterfly Migration Mystery Quilt
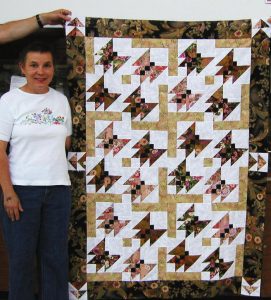
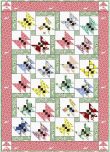
Butterfly Migration is a fun little 45″ x 63″ quilt that looks quite complicated but is actually quite easy to make. We use 2″ and 4″ Thangles for our half square triangles but you can use your preferred method. If you need some help, read our article on How to Make Half Square Triangle Blocks.
This pattern was designed for 30’s prints, but one of our testers used batiks, and the other used orientals. It looked spectacular in both! Use what you like best.
Before beginning this or any other project, wash and press your fabric. Use a little spray sizing when you press your fabric to give it that “new fabric” feel. Take the time to clean your machine, put in a new needle, and fill a few bobbins. You’ll thank yourself for it later:-))
Unless the pattern tells you otherwise, you should always assume that the seam in any quilting pattern is 1/4″ wide. Many patterns depend on the accuracy of this seam, including this one.
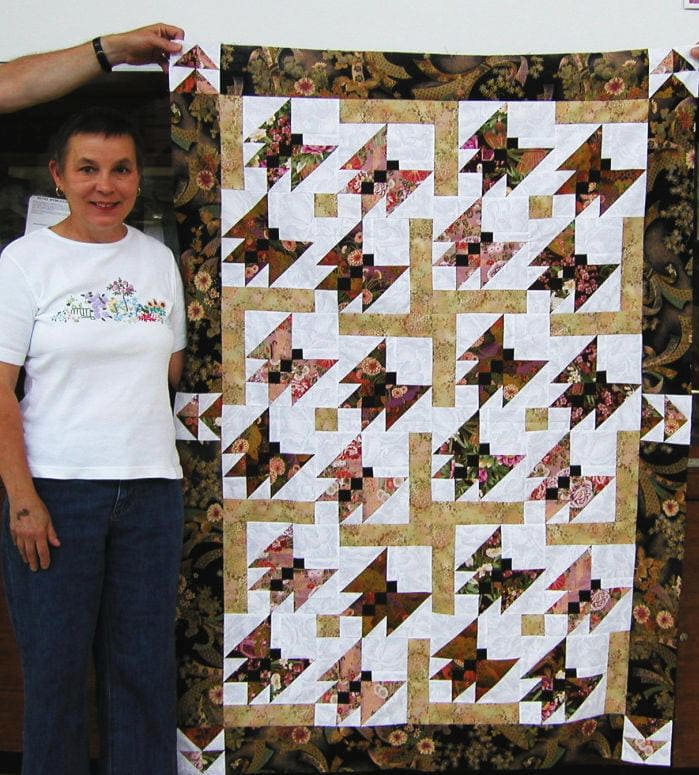
This is one of my earliest mystery quilts from 2004. I didn’t ask people to send me pictures in those days – if you finish one, please send it to me!
Fabric Requirements for the Butterfly Migration Mystery Quilt:
- 3 FQ’s in 1930’s prints (mediums or light darks)
- 1/2 yard sashing, 30’s print (contrasts well with the FQs)
- 3 /4 yard border, 30’s print (complements the above fabric)
- 1 1/4 yard background (white, light tone on tone or muslin)
- 1 FQ black
- 1 package of 2″ Thangles
- 1 package of 4″ Thangles
- a mat that rotates is helpful to square up blocks but not required.
- a 4 1/2″ square ruler is helpful but not required.
- an 18 1/2″ square ruler is helpful but not required.
- a shopping bag will help with random selections
- if you embroider, you might want some black thread and a needle (or a Pigma pen) for embellishments, but this is optional.
Cutting directions:
From each of your fat quarters, cut:
- Two strips 4 1/2″ wide by 22″ long. Cross cut these strips into two 4 1/2″ wide by 11″ long strips. These are for your Thangles. The three FQs will yield 12 strips, four from each print.
- Two strips 2 1/2″ wide by 22″ long . Cross cut these into four 2 1/2″ wide by 11″ long strips. These are for your Thangles. The three FQs will yield 12 strips, four from each print.
- 2 strips 1 1/2″ wide by 22″ long. The three FQs will yield six strips, two from each print.
From your sashing fabric, cut:
- six strips 2 1/2″ wide by the width of the fabric. Cross cut these into 8 1/2″ lengths. You will only need (24) 2 1/2″ x 8 1/2″ strips, so don’t cut more than that. From the leftover piece of the 2 1/2″ strips, cut six 2 1/2″ X 2 1/2″ squares.
From your black FQ, cut:
- Six strips 1 1/2″ wide x 22″ long
- One strip 3″ wide by 22″ long.
From your background fabric, cut:
- Three strips 4 1/2″ wide by the width of the fabric. Cross cut these each of these into four 11″ strips, for a total of twelve 4 1/2″ X 11″ strips.
- Three strips 2 1/2″ wide by the width of the fabric. Cross cut these each of these into four 11″ strips, for a total of twelve 2 1/2″ X 11″ strips.
- Two strips 3 1/2″ long by the width of the fabric. Cross cut these strips into four 3 1/2″ X 22″ pieces.
- Three strips 3 1/2″ X the width of the fabric. Cross cut these strips into twelve 3 1/2″ X 9″ pieces.
- Two strips 2 1/2″ long by the width of the fabric. Cross cut this into (24) 2 1/2″ squares.
From your border fabric, cut
- Five strips 4 1/2″ wide.
Step One: Making HSTs (half-square triangle quilt blocks) using Thangles
Thangles are a method of paper piecing perfect half-square triangles. First, place your print fabric strip right sides together with the same size background strip. Place a Thangles paper on top of the background and pin carefully. Tighten (shorten) your stitch length and sew on the dotted line. You can chain piece these and do them all at once. When you are done, cut apart on the solid lines. One of the dog ears will already be clipped so you only need to clip one as you cut the Thangles apart.

Press with the paper attached. Because you put the paper on top of the light background, the seam automatically presses to the dark. While the paper is still warm, put your thumbnail down on the seam. Grab the paper firmly and pull. The paper should tear away easily starting at your thumbnail.
To make the 4″ HSTs we will need in this project, use the twelve 4 1/2″ wide by 11″ long strips you cut from the fat quarters and the twelve 4 1/2″ wide by 11″ long strips you cut from the background. Sew them using the above directions. You should get 48 HSTs.
To make the 2″ HSTs we will need in this project, use the twelve 2 1/2″ wide by 11″ long strips you cut from the fat quarters and the twelve 2 1/2″ wide by 11″ long strips you cut from the background. Sew them using the above directions. You should get 72 HSTs.
Step Two: Making Flying Geese Quilt Blocks with HSTs
Randomly choose 24 of the (72) 2 1/2″ HSTs you made in the previous step. Sew four of them together in a flying goose block as shown. Make six blocks. You can match the prints, or vary them, it doesn’t matter.

Press the seam between the two flying goose blocks up toward the point.
Step Three: Making Four-Patch Quilt Blocks
Sew each of the 1 1/2″ wide X 22″ long strips from the fat quarters to a 1-1/2″ wide x 22″ long black strip. Press to the black. Crosscut these every 1-1/2″, making 48 two-patches, each 1-1/2″ X 2 1/2″. Matching the prints, sew them again into four patches. Each four patch will have two black squares and two matching print squares.
The four patches will measure 2-1/2″ unfinished. Square these up if necessary. You will have some four patches leftover for another project (or to use in the border) as you only need 24 four patches for this project.

To twist the seams of a four patch so it lays flat, pull apart the last couple of stitches of your two patch seam (it won’t ravel because the second seam putting the whole four patch together will hold it) and twirl those seams so each seam covers one patch.
Step Four: Making A Bullseye Quilt Block
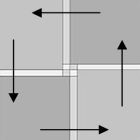
Sew a black 3″ x 22″ strip between two background 3 1/2″ X 22″ strips. Press to the dark. Crosscut this strip into six 3″ wide X 9″ long units.

Sew these three patches that you just made between two 3-1/2″ X 9″ background strips as shown below. It will make a 9″ unfinished block. You will need to make six bullseye blocks for this project. Press to the dark.

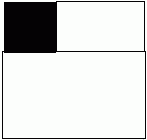
Cut your bullseye block into four squares by cutting down the center, rotating the mat, and cutting down the center again. You will have (24) 4-1/2″ blocks with a spot in the corner.
 |  |
 |  |
Step Five: making the Butterfly Migration Quilt Block
You now have all the pieces you need to make this quilt. Let’s take inventory and double-check. You should have:
- 24 quartered spot blocks, each 4 1/2″
- 48 HSTs, 4 1/2″ size
- 48 HSTs, 2 1/2″ size
- 24 Four patches, 2 1/2″
- 24 background squares, 2 1/2″ size
- 24 sashing strips, 2 1/2″ x 8 1/2″
- 6 sashing squares, 2 1/2″ size
Sort your inventory into 3 piles, matching the prints. From each pile, sew the four patches, the small HSTs and the 2 1/2″ background squares into a four patch as shown in the picture thumbnail below. Make eight from each print. Twirl the seams as described in Step Three. Press and square up to 4 1/2″ if necessary.

Using the blocks you just made, the larger HSTs and the quartered spot block, make this four patch. Twirl the seams, press, and square up to 8-1/2″ if necessary. Make 24 blocks. Optional: If you are an embroiderer, you can embroider antennae, or use a Pigma pen to draw them on.
Put all your blocks in a shopping bag and put the bag in a safe place so it doesn’t get thrown out accidentally!

Step Six: The Sashing
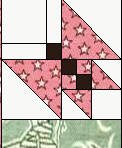
Randomly choose six of the butterfly blocks and sew a 2-1/2″ X 8 1/2″ sashing strip to the right side. Press to the sashing strip.
Randomly choose six of the butterfly blocks and sew a 2-1/2″ X 8 1/2″ sashing strip to the left side. Press to the sashing strip.
Randomly choose six of the butterfly blocks and sew a 2-1/2″ X 8 1/2″ sashing strip to the top. Press to the sashing strip.
Randomly choose six of the butterfly blocks and sew a 2-1/2″ X 8 1/2″ sashing strip to the bottom. (see below) Press to the sashing strip.
Step Seven: Bigger Blocks
Did you try to put the blocks together in the last step? I bet they didn’t fit! That’s because you need that little 2 1/2″ sashing square to make a block like this picture thumbnail below. Click on the picture to see it up close.
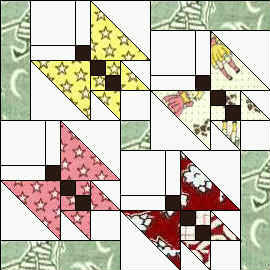
Lay these blocks out on your sewing table in the configuration shown above. The sewing order below is only a suggestion – sew this group together in the way that feels the most comfortable to you. Read through the steps first. You may prefer only a partial seam in the first step rather than a complete seam which will have to be partially unstitched later.


Make six of these blocks. Press from the back to make sure the seams aren’t twisted. Square up to 18 1/2″ if necessary.
Step Eight: Setting and border
Sew your blocks in a 2 X 3 arrangement, taking care to create the pinwheel with the sashing.
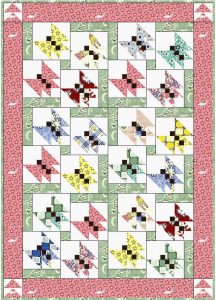
Measure through the center horizontally in two places. Average this number and cut two border strips to this length. Sew one of the flying geese blocks you made in step two to either end of this border. The picture shows the points all facing in the same direction, but they don’t HAVE to. Butterflies and geese fly in directions of their own.

Measure through the center vertically. Cut two border strips to this length. Since your quilt is probably longer than your strips, you will need to piece this border. You might want to insert one of the leftover flying geese blocks or four patches at the seam. It doesn’t have to be right at the middle, and it doesn’t have to be at the same height on both sides. It’s YOUR quilt.
Marking the centers, pin this strip to the sides of your quilt and sew with the quilt on top so you can make sure your seams don’t twist. If it doesn’t quite match, ease it in place. Forcing your top to match borders cut to the same size will help ensure that it is square. Press to the border.
Again matching the centers, sew the top and bottom strips with the flying geese blocks in the corners. Press to the border and… you are done! Hang your top on the wall so you can admire it and your family can praise you. Your quilt will tell you how it wants to be quilted. Don’t forget to add a label and, please, send me a picture.
Don’t forget to sign up for the newsletter! Once a week, I send updates on quilt-related information I have found while wandering the web. This might be an inspiring article, a tip or tutorial I have discovered (or written), and occasionally exclusive offers & discounts as well as immediate access to the secret page of free patterns, guides, and printables. You can follow my page on Facebook, or join the Make Believe Quilters group, too.

