Requirements:
- Light blue background
- Dark pink for hearts and candy
- Pink floral for border
- A 12-1/2″ Square Ruler
- Sharp Pins
Cutting Instructions
Dark Pink for Hearts and Candy
- (5) 2″ x 2″ squares
- (5) 1-1/2″ × 2-1/2″ rectangles
- (5) 1-1/2″ × 1-1/2″ squares
Background
- (5) 2″ × 2″ squares
- (10) 1-1/2″ × 2-1/2″ rectangles
- (10) 1-1/2″ × 3-1/2″ rectangles
- (5) 1-1/2″ × 1-1/2″ squares
- (1) 7″ square cut on both diagonals for the side setting triangles
- (2) 3-3/4″ squares, cut on the diagonal for the corner setting triangles
Floral Pink for border
- (1) 48″ long strip 1″ wide
Making the Half Square Triangle (HST) Blocks
The Traditional Method of making HSTs is to place a 1-7/8″× 1-7/8″ dark square right sides together with a 1-7/8″× 1-7/8″ light square. Draw a diagonal line on the back of one square. Sew 1/4″ on both sides of the line. Cut on the line and press to the dark. You will have made two HST blocks which measure exactly 1-1/2″× 1-1/2″ square.
My personal preference is to cut the original squares slightly too large (2″) and square up the HST to 1-1/2″ later on. Using your preferred method, make (5) Dark Pink and Background HSTs. Press to the dark.
Creating the Flowers and Candy Blocks
Using the 1-1/2″ × 1-1/2″ squares from the background and the
1-1/2″ × 1-1/2″ squares from the dark pink, sew (5) groups of two-patches. Press to the dark.
Keeping the dark side of the two-patch on the right, sew a 1-1/2″ × 2-1/2″ dark pink rectangle to the bottom of each group. Press . Make (5).
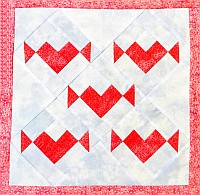
Sew a 1-1/2″ × 2-1/2″ Background rectangle to both sides of the center Heart block. Press to the Heart. It should measure 2-1/2″ × 4-1/2″. Make (5).
Sew an HST to one end of all the 1-1/2″ × 3-1/2″ Background rectangles as shown. Press to the HST.
Sew these units to the top and bottom of the Heart Unit. Your block should measure 4-1/2″ × 4-1/2″. Press to the heart.
Setting the Blocks on point
When you set blocks on point, you need partial blocks for the edges and corners. The Side Setting Triangles are cut from the 7″ Background square on both diagonals. That keeps the edges of the quilt top on the straight of grain.
The Corner Setting Triangles are also cut so the bias is on the inside and the straight of grain is along the edges. They start with a square which is cut on the diagonal. Cut both the 3-3/4″ squares on the diagonal to make (4)
triangles.
Here is how it all goes together.
It helps to lay it all out first to make sure all the hearts are facing in the right direction. (And because it’s pretty!)
Piece as shown below. Press the seams in opposite directions so the just touch each other. That helps keep the block flat. You WILL need to adjust the seam of the center heart to do this.
Here comes the tricky part. This block is about 12″ square. But you want a 12-1/2″ square block! To do this, sew a 1″ wide strip of floral pink fabric on all four sides, giving the block a border of sorts. Press to this border.
Center your 12-1/2″ ruler on this block and cut around the ruler. Ta-da! You now have a Flowers and Candy block which is perfectly square and has a teeny border. If you do this, you will probably lose that border in the seam allowance of the next block. BUT, you don’t HAVE to square it up to 12-1/2″. You could square it up to 13″ to keep a tiny reveal.
If your future project for this block can use a 12″ square block, you don’t have to add this border at all. I plan to finish my block with a knife edge finish, putting the pink on the back, and using this block as a pocket on a tote. Or maybe just a small wall hanging or doll blanket.
How will you use YOUR block? Leave me a reply below!
Please add kris@scrapdash.com to your contacts list to make sure you get the confirmation message. Drag the confirmation message from the Promotion tab to the Primary tab if you use Gmail.
If you are already a subscriber, it’s okay to fill out this form. You won’t be put on the mailing list twice.
Have another tip to offer? Send it to me or reply below and I will add it here.
Don’t forget to sign up for the newsletter! Once a week, I send updates on quilt-related information I have found while wandering the web. This might be an inspiring article, a tip or tutorial I have discovered (or written), and occasionally exclusive offers & discounts as well as immediate access to the secret page of free patterns, guides, and printables. You can follow my page on Facebook, or join the Make Believe Quilters group, too.