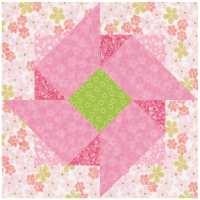
This is a free pattern for subscribers. The form is at the bottom of the tutorial. If you don’t want to subscribe, just click on the large green Print Friendly button at the bottom of this page above the comments.
The Apple Blossom Block
Before starting this project, I recommend that you press your fabric with spray sizing. It will make it easier to cut small pieces. Take the time to clean your machine, put in a new needle, and fill a few bobbins. When pressing, just hold the iron over a spot for a moment or two. This pattern assumes a perfect 1/4” seam.
Fabric Requirements
- Pink for Geese and Square-in-a-Square
Cut (1) strip 2-1/2″ wide. From that strip, cut (8) 2-1/2″ × 4-1/2″ rectangles. Cut (1) strip 3″ wide. From that strip, cut (2) 3″ squares. - Dark Pink for Geese
(4) 2-1/2″ squares. - Light Pink for Geese
(4) 2-1/2″ squares. - Yellow Center
Cut (1) 3-3/8″ square. - Border
Cut (1) strip 2-1/2″ wide. From that strip, cut (4) 2-1/2″ × 6-1/2″ rectangles and (8) 2-1/2″ squares.
Not Required, but if you have them, you will use them:
Overview of Making the Flying Geese Quilt Blocks
This is a traditional method of making Flying Geese Blocks. In this method, you sew a square on one side of a rectangle using a diagonal seam, then flip it over to create one side of the Flying Goose block. Press to the block. After you have double-checked to make sure everything lines up properly, cut off the excess underneath that square. Then repeat the process for the other side.
To use this method, cut a rectangle for the center goose and two squares for the sides. Cut the squares for the sky the same size as the height of the unfinished rectangle.
Make a sample block first. Draw a line on the diagonal on the wrong side of the sky square (shown in blue below.) Lining up the corners of the square with the edges of the goose rectangle (shown in yellow below), pin carefully and sew on the drawn line as shown. Cut off the excess and press. Do the other side, overlapping the first square. Press and trim all dog ears.
Making the Flying Geese Quilt Blocks
Assemble:
- (8) 2-1/2″ × 4-1/2″ Goose rectangles.
- (4) 2-1/2″ Dark Pink squares.
- (4) 2-1/2″ Light Pink squares.
- (4) 2-1/2″ Border squares.
Following the directions above, make (4) Half Flying Geese Blocks with a Border corner on the right. This is Goose “A”. (This is where I changed my mind. I originally had a Goose corner on the left but decided that was duplicate work.)
Again following the directions above, make (4) Flying Geese Blocks with a Dark Pink corner on the left and a Light Pink corner on the right. This is Goose “B”.
Press and square up to 2-1/2″ × 4-1/2″ if necessary. If you have the Quilt-in-a-Day Flying Geese ruler set, you can use that to both trim and square up your blocks. A rotating mat will be very helpful here.
Making the Square in a Square Quilt Block
Assemble:
- (2) 3″ Goose squares
- (1) 3-3/8″ Green squares
The method in this pattern uses a center square with (4) corner triangles. These triangles are created by cutting the 3″ squares on the diagonal.
Sew a triangle to opposite sides of the 3-3/8″ Green square, matching the center of the square with the center of the triangle. Press to the triangle.
Sew a triangle to the remaining two sides of the Background square, matching the center of the square with the center of the triangle. Press to the triangle. Square up the block to 4-1/2″ × 4-1/2″, taking care not to cut off the points.
Oh, No! Partial Seam Piecing!
Really, it’s not that bad. Remember when we used it in the Savanna Scramble block?
Assemble:
- (8) Flying Geese
- (4) 2-1/2″ × 6-1/2″ Border rectangles
- (4) 2-1/2″ Border squares.
- (1) 4-1/2″ Square-in-a-Square Block
Step Four: Sew it together using partial seam piecing. Start by sewing the Square in a Square block to the lower right of Block #1, stopping about halfway. This is your “partial seam”. (Shown above)
Sew Block #2 on the bottom of that. Sew Block #3 along the side. After you have sewn on Block # 4, then you go back and finish that seam.
Please add moc.hsadparcs to your contacts list to make sure you get the confirmation message. Drag the confirmation message from the Promotion tab to the Primary tab if you use Gmail. @sirk
If you are already a subscriber, it’s okay to fill out this form. You won’t be put on the mailing list twice.
Have another tip to offer? Send it to me or reply below and I will add it here.
Don’t forget to sign up for the newsletter! Once a week, I send updates on quilt-related information I have found while wandering the web. This might be an inspiring article, a tip or tutorial I have discovered (or written), and occasionally exclusive offers & discounts as well as immediate access to the secret page of free patterns, guides, and printables. You can follow my page on Facebook, or join the Make Believe Quilters group, too.