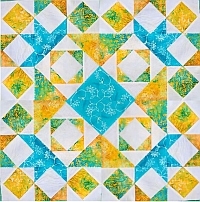
All Kinds of Square! A Square in a Square Quilt Block Tutorial, Part Three

How many different ways are there to make a square-in-a-square quilt block? So far, I have found 10 different methods for making this versatile block, also known as the diamond-in-a-square quilt block. Set it on point a second time and it becomes the economy block! Here are four more ideas.  How many variations can YOU find?

A Square in a Square block is basically a square set on point, so all the tips that apply to setting a quilt or block on point also apply to a Square-in-a-Square block.

Method # 8: Foundation Piecing

Foundation piecing (FPP) is the technique of sewing fabric to a foundation in order to achieve very precise results. The foundation can be fabric or paper.  The first piece that you place on the foundation is placed right side up.  Every subsequent piece is laid right side down along the edge of the previous piece, allowing space for a seam allowance. After the piece is sewn, it is flipped over and pressed.

I wrote a tutorial about this method called The Seven Deadly Sins of Paper Piecing because you will make at least ONE of these mistakes when you learn to paper piece.

Paper pieced patterns are printed with the numbered steps printed on the back of the paper.  It helps to have a focused light source so you can see through the paper and get a good idea of where to place the fabric. It won’t need to be exact as you will trim it later.

Did you know you could use your iPad as a lightbox?  Just maximize the brightness in settings and open your iPad to a blank browser page or notes page.  Gently lay your paper and your fabric on the iPad and you should be able to see the placement of the fabric on the line.

You could also use freezer paper as a foundation.  I’ve never done it, so I am going to defer to someone who has.  Read about the freezer paper method of paper piecing on The Crafty Quilter.

Method # 9: Studio 180 Rulers

Studio 180 rulers all have one thing in common: you cut large and then square up. The Square Squared rulers are no exception.  You will cut a center square and sew on four corner triangles, just as you did in Method # 1.

Square-Squared-Ruler

Start with cutting the center square. Since I am making a 4-1/2″ square-in-a-square block, I need to find the square on the left that says “Center Square for 4″ Finished Blocks”.  Right next to that the sentence “Cut from 3-1/2” strips.  That tells me what size strips to cut.

Cutting the Center Quilt Square

For this sample block, I am going to need 3 center squares of a medium and 3 center squares of the background.

I am also going to need to cut the squares that will be cut on the diagonal to make the corner triangles.  But what size?  The ruler will tell you.  The chart is in the corner.

Studio 180 Square in a Square Ruler

I need to cut (6) 3-1/4″ background squares, (4) 3-1/4 medium squares and (2) 3-1/4″ dark squares.

Studio 180 Square in a Square Ruler

The corner of this ruler has a 45-degree angle, which makes it easy to accurately cut the square on the diagonal.

Studio 180 Square in a Square Ruler

OK, I am ready to sew!

Studio 180 Square in a Square Ruler


Just as you did in Method # 1, you sew triangles on alternate sides. That Small Oliso Iron is very handy. It’s just the right size for these blocks. Try to do a better job than I did centering that triangle:-))

Studio 180 Square in a Square Ruler

Press them open and sew on the remaining two sides.

Studio 180 Square in a Square Ruler

When you open up the block, it will be sloppy.  No matter.  Your next step is to square them up.

Studio 180 Square in a Square Ruler

For this sample, you will need (1) block with a background center, (2) blocks with a medium side and a dark side, and (3) blocks with medium centers.

Studio 180 Square in a Square Ruler

Use the other side of the ruler to square up this block by placing it so the center is within the square-in-a-square lines. Cut around two sides, move the ruler and cut around the other two sides.

Studio 180 Square in a Square Ruler

Method # 10: Creative Grid Rulers

Let’s use the CGRJAW8 ruler to make an economy block.  The directions that come with the ruler give instructions for making the Economy block and the Snail Trail block, but they only give cutting sizes for the snail trail.  I used the On Point Chart to discover that I need to cut (2) 3-3/4″ background squares on the diagonal for the four corners of the first block.

This makes a 6-1/8″ square, which I would normally find very difficult to square up. However, the Creative Grid ruler was helpful.  It had two black lines I could use to match up with the center square.  Nice.

Squaring up a quilt block with a CGR ruler

The last square I needed to cut on the diagonal for the four corner squares was a 5-1/4″ square.  I guessed at this number, figuring that if it was too big, I would just cut it off.  [Kris’s Note: the math says I should have used a 4-7/8″ square.]

I needed two squares, (1) medium and (1) dark. Here is what I made, shown with the CGRJAW8 ruler on top so it can be squared up.  Notice how the middle square-in-a-square is centered in the square.

Square in a Square Quilt Block Ruler

The picture below is a graphic of four blocks put together.

Square in a Square Quilt Block

Bonus Method: Easy Angle Ruler

I found this method at the last minute.  Since the tutorial was already done by Bonnie Hunter, I am going to just refer you to the expert:  https://quiltville.blogspot.com/2005/06/square-in-square-tutorial.html

Sew, what did you think?

What was your favorite method?

Here is Square in a Square Tutorial Part One

Here is Square in a Square Tutorial Part Two

This is Square in a Square Tutorial Part Three

Please add moc.hsadparcsobfsctd@sirk to your contacts list to make sure you get the confirmation message. Drag the confirmation message from the Promotion tab to the Primary tab if you use Gmail.

If you are already a subscriber, it’s okay to fill out this form. You won’t be put on the mailing list twice.

Have another tip to offer? Send it to me or reply below and I will add it here.

Don’t forget to sign up for the newsletter! Once a week, I send updates on quilt-related information I have found while wandering the web. This might be an inspiring article, a tip or tutorial I have discovered (or written), and occasionally exclusive offers & discounts as well as immediate access to the secret page of free patterns, guides, and printables. You can follow my page on Facebook, or join the Make Believe Quilters group, too.