

Back in the early days of the Internet, I owned one of the very few online fabric shops called

Besides offering fabric for sale, I also offered tips, tutorials and free quilt block patterns. One of them was the Independence Day quilt block. I had to go to the Wayback Machine to find the pattern as the computer I used back then was lost in our house fire of 2002. Apparently it came from EQ4! Here are some other patterns I linked to at the time:
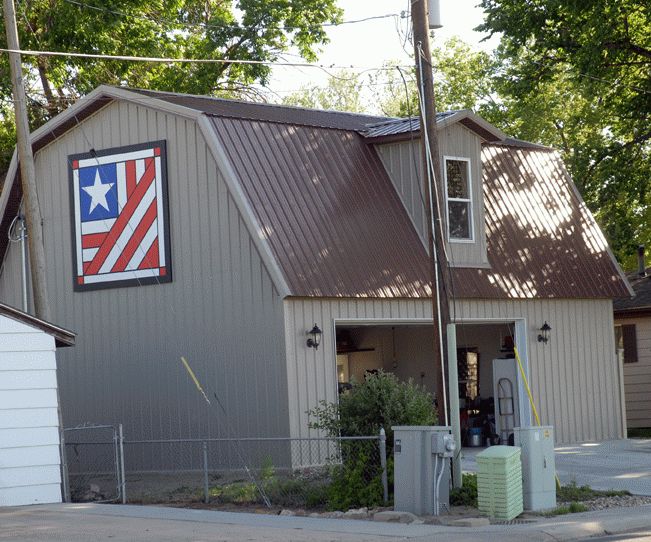
You might remember the Quiltbus, which was our traveling quilt shop. That’s where I finally found the tutorial, along with this picture which a customer sent me in 2007. I’ve since seen that block in several other places.
Here is the Independence Block.


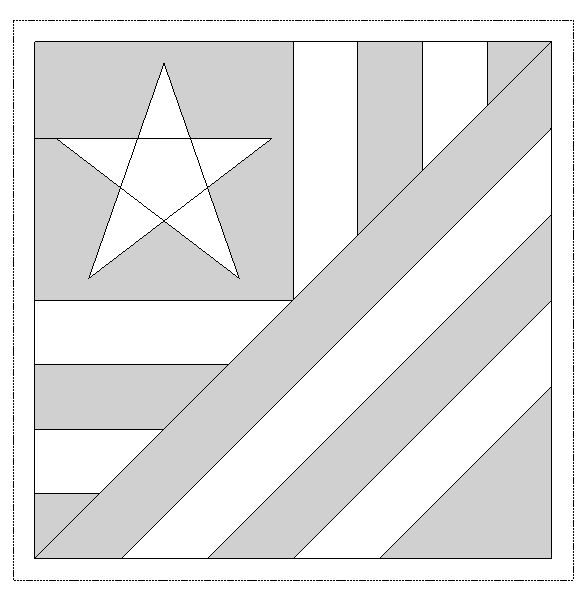
The last block above is a paper piecing diagram, but it is not sized correctly to be printed. If you decide to make it, I suggest you draw it out in three or four sections using Paper for Foundation Piecing which is see-through and tears away easily. Read the pattern below for more suggestions. Note that this pattern does NOT create a 12-1/2″ block.
Our Independence Day Quilt Pattern
(the original from 10/16/2001)
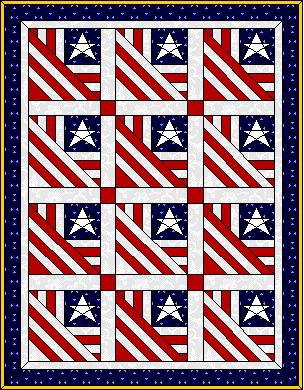
| This charming 38″ x 49″,wall hanging can be paper pieced in no time. Fabric requirements: Red: 1 yard White: 2 yards Blue: 1 1/2 yds Gold: 1 yd binding |
Kris’s note: I notice that I did not give instructions for how to paper piece or applique. I guess I assumed that everyone would know how to do that. If you have trouble with it, my far-more-recent tutorial on How to Paper Piece is here. My tutorial on How to Fusible Applique is here.
 | Cut these strips. Although they will be pieced on the diagonal, it is not necessary to cut or piece these on the diagonal as the paper will hold them in place. WOF means Width of Fabric. 1- 1/2″ white strips: 9 x WOF 3″ wide white strips: 1 X WOF 2- 1/2″ wide white strips 4 x WOF 2- 1/2″ white strips; 7 x WOF 1- 1/2″ red strips: 2 x WOF 2″ red strips: 2 x WOF 2- 1/2″ red strips; 2 x WOF 3″ wide red strips: 1 X WOF 2- 1/2″ wide red strips 4 x WOF 5″ blue strips: 2 x WOF 2- 1/2″ blue strips 5 x WOF |
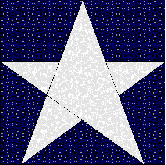
| Start by paper piecing the star above. Click on the star for a paper piecing pattern or click here for a way to cut a five pointed star in one snip to applique. The paper pieced pattern finishes to 4- 1/2″ square – be sure to leave a seam allowance around the outside. Make 12 Stars. Now paper piece the red and white triangles. You will need to make 12 of each of these. Be sure to leave a seam allowance around the outside. | Click on these pictures for a paper piecing pattern 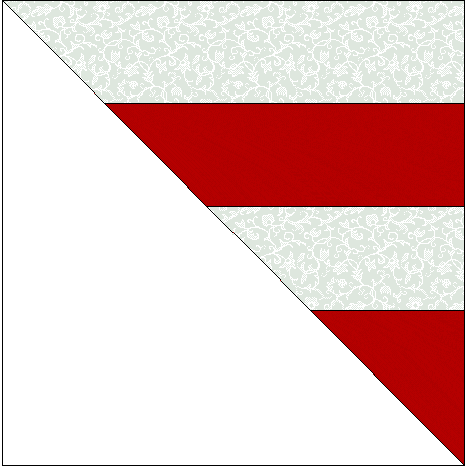 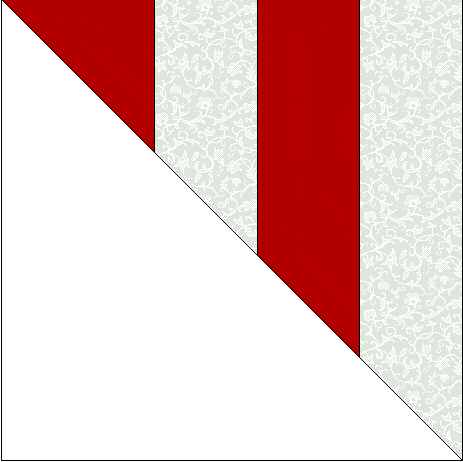 |
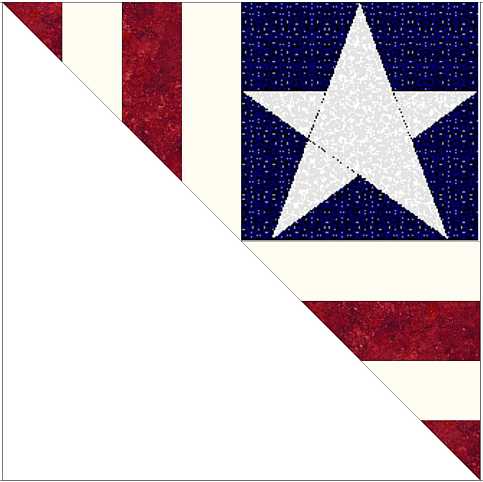 | Referring to the picture of the block for placement, sew the three units together. Press. |
| Piece the bottom half of the block, as shown. Do 12 of each. Press. This block measures 9-1/2″ square unfinished. |   |
 | Sew the two halves together. Press. You can remove the papers at this step, or wait until the top is completed. |
| Cut the 2 1/2″ white strips into (17) 9 1/2″ lengths. Some of the strips will be left over – set them aside. Cut (6) 2 1/2″ X 2 1/2″ squares of the red. Again, you will have some left over. Set them aside. Sew a 2- 1/2″ X 2- 1/2″ red square to both sides of 3 white pieces. Sew a white piece to either side of the red. | |
 | Sew a white piece between the blocks. |
| Now add everything together! |  |
 | Measure through the center, both vertically and horizontally. Your horizontal measurement should be 31″ and your vertical measurement should be 42″. Cut two pieces of the 1- 1/2″ white fabric 42″ long and add it to either side of the top. Cut two pieces of the 1- 1/2″ white 32- 1/2″ long and sew it to the top and bottom. Press to the dark. Measure again, through the center. Your horizontal measurement should be 33- 1/2″ and your vertical measurement should be 44- 1/2″. Cut two pieces of the 2 1/2″ blue by 44 ˝ and sew it to both sides. Cut two pieces of the 2- 1/2″ blue by 38 and sew it to the top and bottom. Press to the dark. |
 | To make the bias binding: Cut a square of the gold fabric 21″ x 21″. Cut in half on the bias. Putting right sides together as shown, sew edges in Ľ” seam. and press open. With ruler, mark a 6″ strip, 2- 1/4″ wide. Right sides together, match A’s and B’s. Sew a Ľ” seam and press open. You now have a bias tube. Continue the 2Ľ” cut, turning the tube until you have it all cut. |
 |  |
More notes: I don’t know why I suggested bias binding. A straight binding would be perfectly fine.
Here is an article on Binding Basics.
To Print this pattern, use the green Print Friendly button at the bottom of the page.
Another Barn Block
This block is from the Tri-Recs tutorial.
Please add kris@scrapdash.com to your contacts list to make sure you get the confirmation message. Drag the confirmation message from the Promotion tab to the Primary tab if you use Gmail.
If you are already a subscriber, it’s okay to fill out this form. You won’t be put on the mailing list twice.
Have another tip to offer? Send it to me or reply below and I will add it here.
Don’t forget to sign up for the newsletter! Once a week, I send updates on quilt-related information I have found while wandering the web. This might be an inspiring article, a tip or tutorial I have discovered (or written), and occasionally exclusive offers & discounts as well as immediate access to the secret page of free patterns, guides, and printables. You can follow my page on Facebook, or join the Make Believe Quilters group, too.

Comments are closed.