Nifty Novelties – a free braided tabletopper pattern to feature your favorite print.
Note: This post may contain affiliate links. That means we may earn a commission at no additional cost to you if you purchase via our links. Not all links are affiliate links. I only recommend products I use and trust. As an Amazon Associate, I earn from qualifying purchases.
I am delighted to be part of the Nifty Novelties blog hop. Novelty fabrics can be a challenge to use in a project – or they can be an inspiration! The bloggers that are part of this blog hop have created new ideas for using these fabrics. I have made an easy table topper pattern for you that only uses three fat quarters.
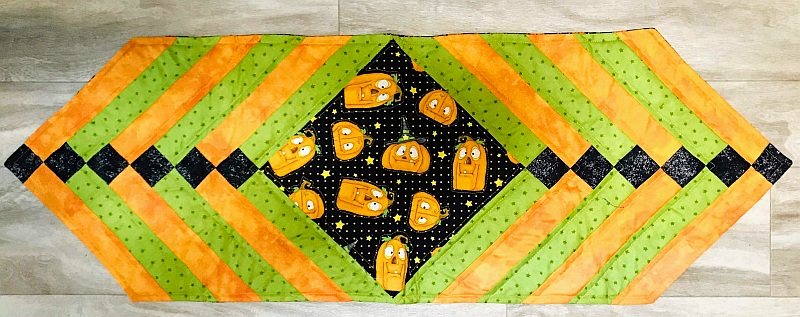
Free Braided Table Topper Quilt Pattern
This 12″ x 38″ table topper makes up very quickly out of three different fat quarters. Fix yourself a cup of hot tea and I bet you are done before it cools!
For illustrative purposes, we are using the color names shown in the example. You are free to use whatever color you please, of course:-))
A 1/4″ seam allowance is assumed.
Cutting
Start by cutting a 9-1/2″ x 21″ strip from each of the (3) fat quarters. Cut the remainder of each fat quarter into (4) 2″ x 21″ strips.
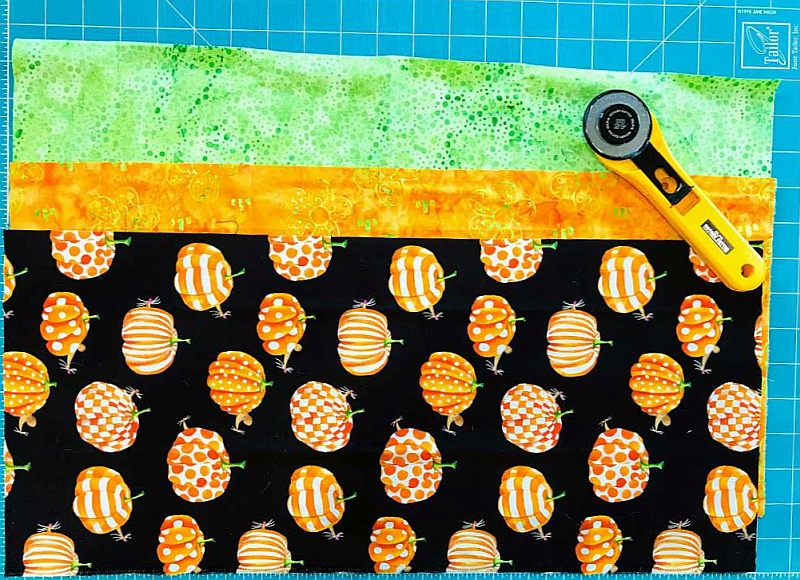
- From both the orange and green 9-1/2″ x 21″ strips, cut a piece 9-1/2″ x 12″. Set aside the remainder for use in another project.
- From the novelty 9-1/2″ x 21″ strip, cut a 9-1/2″ x 9-1/2″ square. Set aside the remainder for use in another project.
- From both the orange and green 2″ x 21″ strips, cut (6) 2″ wide x 9-1/2″ long strips, for a total of 12 strips. Avoid using the selvage. Set aside any remaining fabric for use in another project.
- From the novelty 2″ x 21″ strips, cut (2) that are 12″ long. Set aside the remaining strip for use in another project.
Sewing and Cutting
Sew a 2″ x 12″ novelty strip to the short side of the 9-1/2″ x 12″ orange piece, making an 11″ x 12″ block. (see below)
Repeat for the green. Press to the dark. Cut these blocks into (6) two-part strips 2″ x 11″ long.
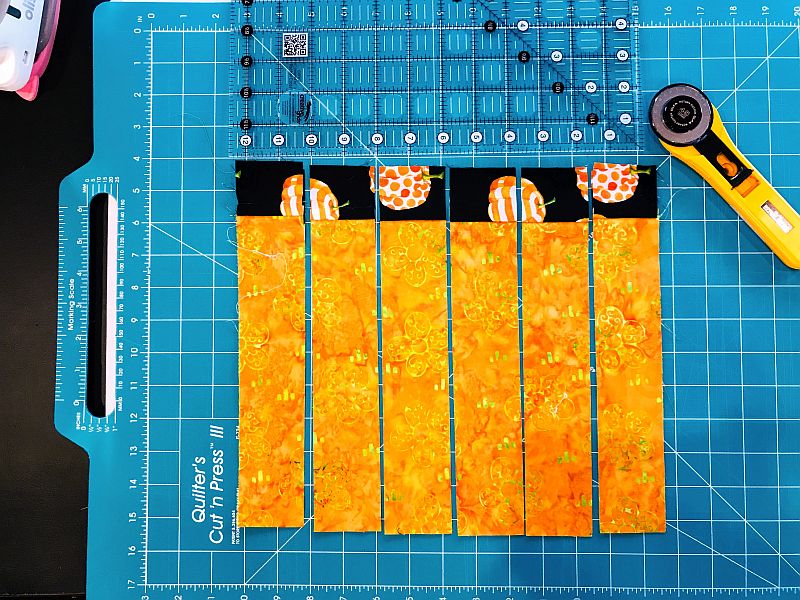
For this project, you will need:
- (6) 9-1/2″ x 2″ strips of orange
- (6) 9-1/2″ x 2″ strips of green
- (6) 11″ x 2″ two-part strips of orange and novelty
- (6) 11″ x 2″ two-part strips of green and novelty
- (1) 9-1/2″ x 9-1/2″ novelty square.
Now it is time to put them together, but first a note on pressing. It is almost impossible to keep your strips pressed to the dark. Rather, you should try to keep them all pressed away from the center square. Pin carefully as you piece this top together. Nesting the seams will help you keep your intersections sharp.
Sewing
Sew a 2″ x 9-1/2″ long green strip to either side of the 9-1/2″ x 9-1/2″ novelty square. Press to the center.
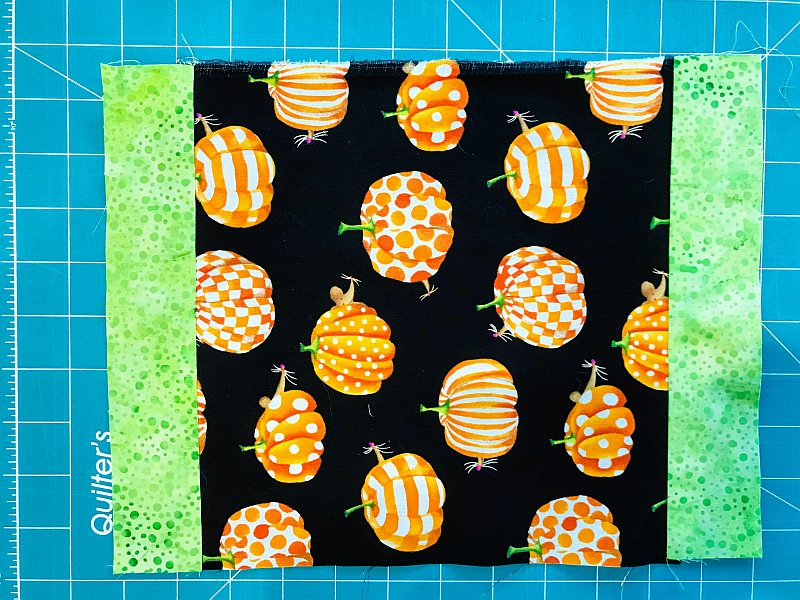
Sew a two-part green strip to the other two sides, placing the small square at opposite corners as shown to the right. Note that the strip will not go all the way to the end of the block. It feels really odd, but don’t worry about it, you are doing okay.
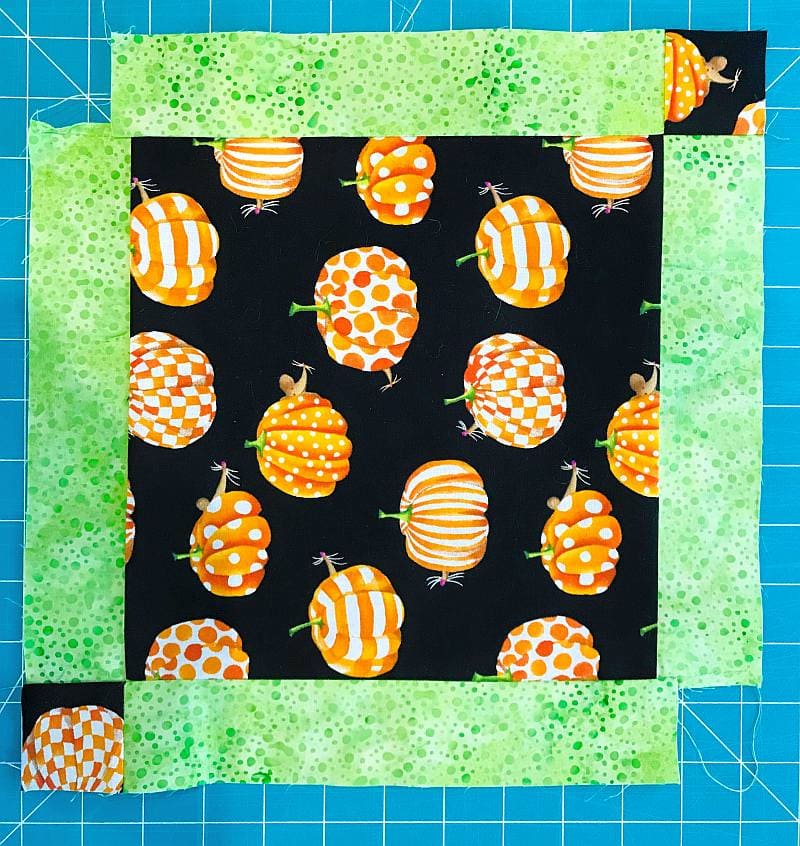
Sew an orange 9-1/2″ x 2″ strip to the two-part green strips on both sides of the table runner, starting with the end that has the little square. Remember, this strip won’t reach all the way to the end of the previous strip.
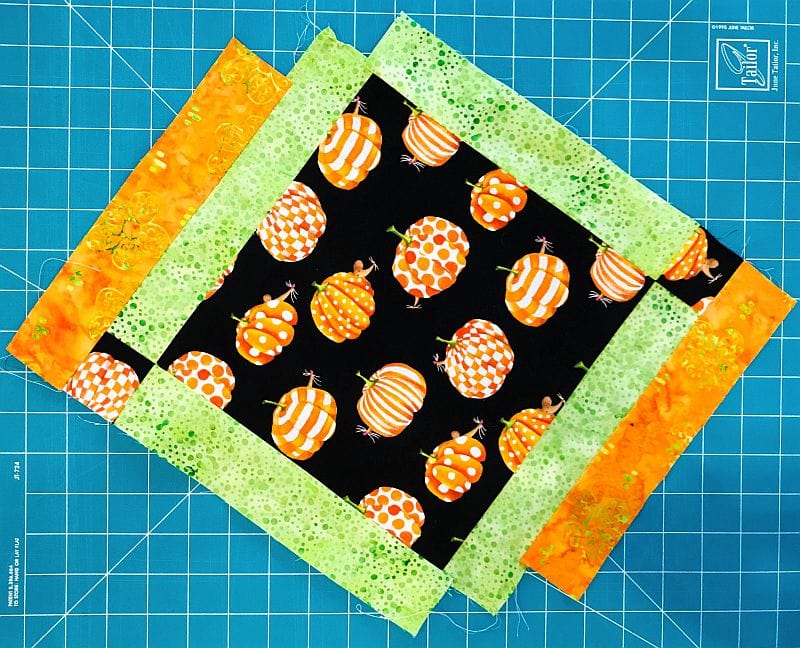
Now add a two-part orange strip, again starting at the end that has the little square. Double check to ensure that the seams fold in opposite directions. Keep adding strips, alternating colors and making sure to place the square on the correct corner. Do you see how it is going together almost like a log cabin?
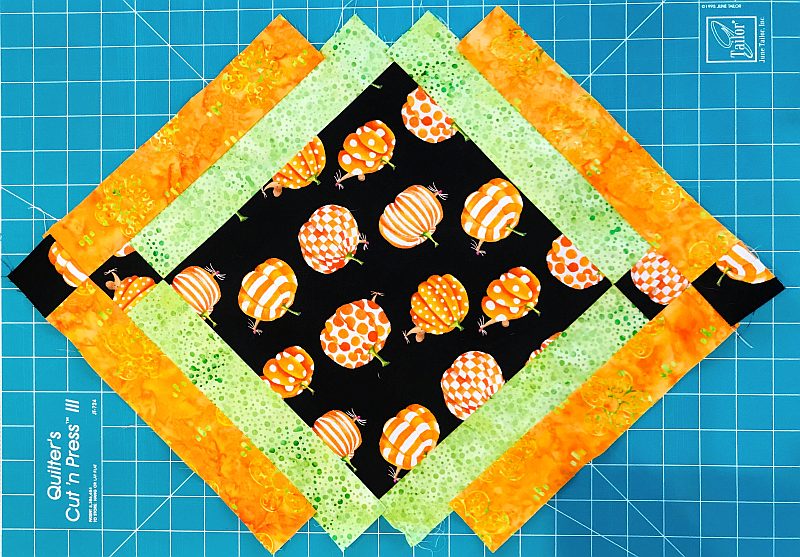
After you have sewn all your strips, press carefully. Get all those seams going in one direction on the back so the top lays flat. Now place your ruler in the body of this top and rotary cut it straight. Make sure your 1/4″ mark lines up with the point of the center square so you don’t cut off your point when you sew on the binding. (The diagram below shows where you should lay the 1/4″ mark on your ruler.)
You are almost done! Just add batting and backing, quilt as desired. You can “pillowcase” this topper to finish it or use 92″ of commercially prepared bias binding or make 92″ of 2-1/2″ wide straight-grain binding from the leftover white. Don’t worry about the Quilt Police, they don’t write tickets on any straight grain binding under 100″ long.
(Yes, this is our original pattern from 1996:-))
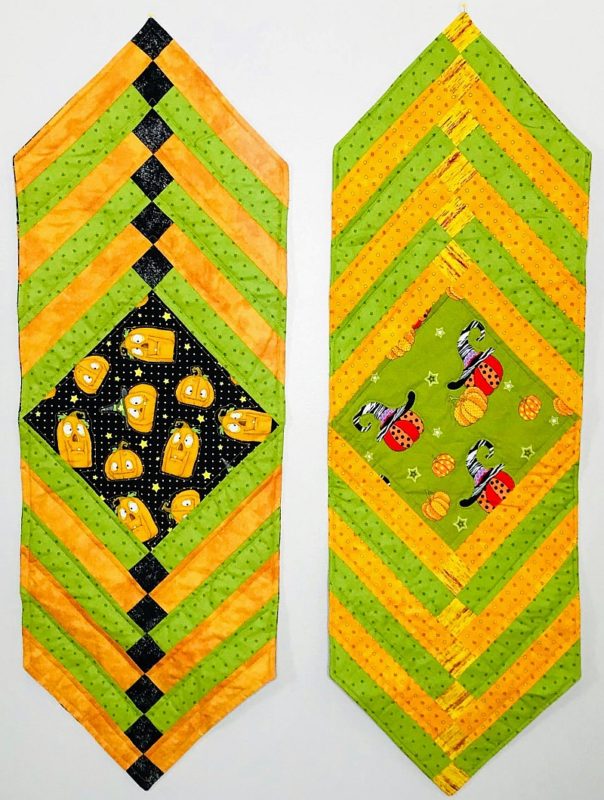
Enjoy!
Here are other Halloween ideas:
- Boo!-ti-ful Halloween Wall Hanging or Lap Quilt
- Halloween Hoppin’ – Using Purple in a Halloween Quilt
- Halloween Freebie – Spiders in My Attic
- Ghastly Ghouls and Zombies
- A Batty Pumpkin Quilt Block
- Free Braided Table Topper Pattern for Halloween
- Orange You Glad Harvey?
- Boo! A Fussy Cut Monster Mash Quilt Block
- A Quilted Halloween Story
Don’t forget to sign up for the newsletter! Once a week, I send updates on quilt-related information I have found while wandering the web. This might be an inspiring article, a tip or tutorial I have discovered (or written), and occasionally exclusive offers & discounts as well as immediate access to the secret page of free patterns, guides, and printables. You can follow my page on Facebook, or join the Make Believe Quilters group, too.


Great way to show off some cute prints. I like the braid pattern.
What a fun table runner; thanks so much for the free pattern!
Love this! Thank you for sharing! Especially the fabric in the centre…have to find something similar…
A fantastic way to use a special fabric motif as well. Thank you for the share of the pattern.
Scrapdash.com Thanks for a great idea for a table runner!! I love making table runners, and will definitely mark yours for later use!!
Love the table runner. Thank you for a the tutorial.
Thanks for the free pattern! It’s a great way to use a focus fabric.
Thanks for the tutorial!
Great project for your novelty fabric.
clever idea
Love the braided runner. Thank you for the tutorial Scrapdash.com. I entered the giveaway here
Cool Technique!!! I love the colors to.
Kris’s Scrapdash never disappoints! Thanks so much for the tutorial on this quick and lovely tablerunner!
Thanks so much for this pattern and tutorial….table runners have been my focus lately. I’m happy to add this one to my “runner repertoire”! Blessings…
Great idea, love the runner. I am entering at scrap dash.
That’s a neat pattern, and I love the pumpkin fabric!
Your braided table runner is wonderful!! I made 6 braided table runners when I first started making quilts…I could have made a huge quilt with them because they were at least 6′ long!! What was I thinking?? I think I need to make some more, but a bit smaller. Thank you for the tutorial!
I am entering at Scrapdash. Thank you for the free pattern. Will be following you.
What a great way to use some of my novelty prints! Thank you for the project. Entering at Scrapdash.
Entered at “Srapdash” Blog 🙂 Loooove the Runnner! Thank you for sharing pattern!! See man ydifferent Holiday ideas too..fun pattern 🙂
Great project for showcasing a special fabric. Thanks
I’m entering at Scrapdash. Thanks for the easy to create table runner pattern & a great way to feature novelty prints for any theme/season of decorating. Thanks for sharing your creativity.
Very cute. Looking forward to making one with your instructions. Thank you
What an excellent tutorial for the braided runner! I will be sure to save this for future runners. I am posting on Scrapdash.
Thanks for the tutorial.
Thanks so much for being a part of this blog hop!! I love the design of the table runner! (And the great chance to win!!) 🙂 Thanks!!
I should make one of these for my mother in law. She likes to decorate the table and is impossible to shop for!
Hi, that’s a great table runner and would certainly work for any type of fabric. Thanks for sharing!
Thanks so much for the tutorial – so fun! Entering at Scrapdash.
Scrapdash, I love your table runner pattern. Thank you for the tutorial.
What a fun table runner to make. Thanks for the chances for a giveaway.
Love the table runner , thank you so much for that!
I’m entering at ScrapDash. Thanks for the great tutorial.
Cute tablerunner! Thanks for the tutorial.
I am entering on Scrap Dash. very cute table runner!
Scrapdash–Thanks for the tutorial for the neat table runner–very cute!
I am entering at Scrapdash. Darling table runner. Thanks for sharing the pattern!
TFS this wonderful tablerunner. I love how the centre features the pumpkins!
Thanks for the pattern. What a great way to play and have fun decorating a table for any season. Of course you picked my all time favorite Halloween, and that just made my heart happy! 😉
Entering at Scrapdash! Love your tablerunner! Thank you, Susan
Scrapdash has become one of my favorite blogs! Thanks for sharing you pattern, I’m not sure why but I’ve never tried that one before. Appreciate you sharing you time and talent!
Thanks for the cute pattern. I have a coffee table this would be perfect for!
Love the pattern, thank you for sharing..
It is a beautiful table runner – the orange and the green are stunning and add a lovely enhancement to the novelty print. Thank you so much for the pattern,
I really like the table runner, would make a lovely gift using any novelty fabric.
Entering at Scrapdash. Thanks for the pattern!
Nancy A: SewingGranda@gmail.com
Entered at scrap dash! Thank you for the great pattern and the chance to win!
Scrapdash! Great table runner and tutorial! Thank you for sharing it.
Thanks, I have always wanted to make this design/
Thank you for sharing your talent! This looks so easy to do but just fancy enough to look like it was hard, lol.
Thank you for sharing your talent! This looks so easy to do but just fancy enough to look like it was hard, lol.
Scrapdash.com!
Lovely table runner pattern! I must try this.. thanks so much for sharing! xx