Rail Fence Quilt Block Tutorial
Note: This post may contain affiliate links. That means we may earn a commission at no additional cost to you if you purchase via our links. Not all links are affiliate links. I only recommend products I use and trust. As an Amazon Associate, I earn from qualifying purchases.
The Rail Fence Quilt Block is a great block for beginner piecers and quilters. Here is a tutorial on how to make one with just two rails. The rails I demonstrate with are 2″ x 3-1/2″ but that is not a hard and fast rule. Use the size that you need for your project.
If you are new to piecing, one of the most important things you need to do is to figure out how to cut along the straight of grain. Cutting along the straight of grain means that you are cutting parallel to the selvage (sometimes spelled selvage.) It is the most stable of all cuts because there is very little give to it. Many quilt pattern designers will specify that you cut the outer border along the selvage because the final quilt will lay flatter and hang straighter.
Crossgrain cuts that are made from selvage to selvage are also considered straight of grain but they have a little more give to them. A cross-grain border is a more economical use of fabric, especially in a very long quilt. You will have seams in a long border, and you do have to pin carefully so that the border doesn’t stretch, but it’s really not a big deal.
Bias cuts are made on a 45-degree angle. Piecing with bias cuts can be tricky. Spray starch and sharp pins will become your best friends if you use a lot of bias cuts.

If you don’t see the selvage on a piece of fabric, you can always rip it one or two inches away from the edge. It will always rip along the straight of grain. Press that messy edge and begin cutting another inch or sew away from that edge to avoid damaged threads.
A Quick Note:
This is the first project I have attempted to make in our “winter home” – a fifth-wheel travel trailer. That’s the kind with a piece that fits over the back of a pickup truck. In our trailer, that is our bedroom. So I am working in a fairly small space. If you do the same, I would be interested in any space-management tips you can offer.

This is my kitchen island. I am using June Tailor Cut-n-Press, which has a cutting surface on one side and an ironing surface on the other. I packed my Oliso Mini-Project iron when I left home, thinking it would be a good thing for me on the road. It is, but it gets HOT. Fortunately, it has a “solemate” with it, which is where you can leave it when you are not pressing something.
Cutting:

My CGR12 square ruler was perfect for cutting the strips, but I needed my long ruler to cut them to length. The CGR812 has a nice feature: it counts from both ends. So I was able to cut my strips to length quite easily.

In case you were wondering, here is how I store my rulers when we are in place. (I pack them when we move.) I hang them from a curtain rod positioned below the window. It needs to mount firmly because those rulers are heavy. That rod is screwed into the side covers of the window.
 YAY, time to sew!
 YAY, time to sew!
I have a walking foot on this machine so I have to kinda guess at the 1/4″ seam allowance when sewing two strips together.

Here’s a Tip: Setting the seam on a strip set helps it lay flatter. To set the seam, just press it while the two strips are still together. Then open it up and press to the dark. Your seam will be sharper.

It always helps to have a square quilt ruler the size that you need when cutting square quilt blocks. I didn’t, much to my dismay. Later on, I realized I did have a square-up ruler of this size, but I didn’t think of it at the time. For the record, I do recommend the Riley Blake Designs Trim-It Square Ruler Pack, which has (5) square rulers: 2.5″, 3.5″, 4.5″, 5.5″, 6.5″. I will show you one in the squaring up part of this tutorial.

Yes, I always pin my quilt units together to make sure the seams just touch each other in the middle. It helps the block to lie flat. I am a big fan of Clover 232 Pins. They are thin but not TOO thin, sturdy but not TOO fat.

Always double-check to make sure you are sewing your quilt units together properly! Ask me how I know…

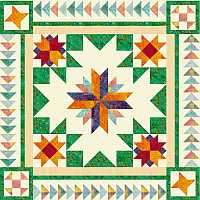
Here is what the block is supposed to look like:

And here is the block I made, being introduced to Jack. (the ripper) This is what happens when you don’t pay attention to how you are sewing a block. Fortunately, a Surgical Seam Ripper can make frog stitching (rip-it, rip-it) quick and easy.
") Time to square up the blocks
Time to square up the blocks
")
Here is the 6-1/2″ Riley Blake Designs Trim-It Square Ruler. Just center the ruler on the block, double-checking to make sure the lines on the block match the seams. Cut around the ruler and you have a perfect block!

For this project, though, I actually preferred the Quilt-in-a-Day Fussy Cut Ruler because I could see through it a little better. To use this ruler, you match the center of the block with the center X of the ruler and make sure the four diagonal lines match up with the corners.
Here is the final block, multiplied four times to make a 12-1/2″ block:

Enjoy your project!
Don’t forget to sign up for the newsletter! Once a week, I send updates on quilt-related information I have found while wandering the web. This might be an inspiring article, a tip or tutorial I have discovered (or written), and occasionally exclusive offers & discounts as well as immediate access to the secret page of free patterns, guides, and printables. You can follow my page on Facebook, or join the Make Believe Quilters group, too.
Questions or comments? Click on Leave a Reply below or Leave a Comment in the upper left-hand corner.
PhoebeMoon Designs is a participant in the Amazon Services LLC Associates Program, a program designed to provide a means for sites to earn advertising fees by advertising and linking to Amazon.com. As an Amazon Associate, I earn from qualifying purchases.


Yes, that looks distracting alright! We had a 2005 30′ Arctic Fox which we bought for several features that were useful. It was very efficiently laid out – more so than the new ones. In the bedroom, there was a vanity that ran under the window, a little stool slid under it. When the bedroom slide went back about 2 feet, there was just enough room in the bedroom. That vanity was my sewing machine spot. The cabinet and drawers on the left of it held fabric and other supplies, and also my FW machine.
It was a step down into the bathroom, and it was the pass through kind. The sink was on the same side as the vanity, and had a counter that was just big enough for a table top ironing board, so that was where I ironed.
The TV went in an entertainment center next to the door, and it had the perfect height top for my cutting mat, with cabinets above it. I loved that 5-er. It had a huge 2-door pantry in the kitchen, a great refrigerator freezer, an apartment-size stove with three burners and an oven big enough for a turkey – though I don’t like turkey. LOL
There was a soft cushion decorative thing all around the big slide out in the living room-kitchen, and I pinned my quilts into that to try things out or take pictures. We took out the banquette and had a carpenter friend build a breakfast bar with cabinets under it instead. All of that worked for us for 5 years. I miss it every day!
this is a very pretty block. and it looks so simple. thanks for sharing.
The form should be right at the bottom of the page. Don’t worry if you are already a subscriber, you won’t be added twice.