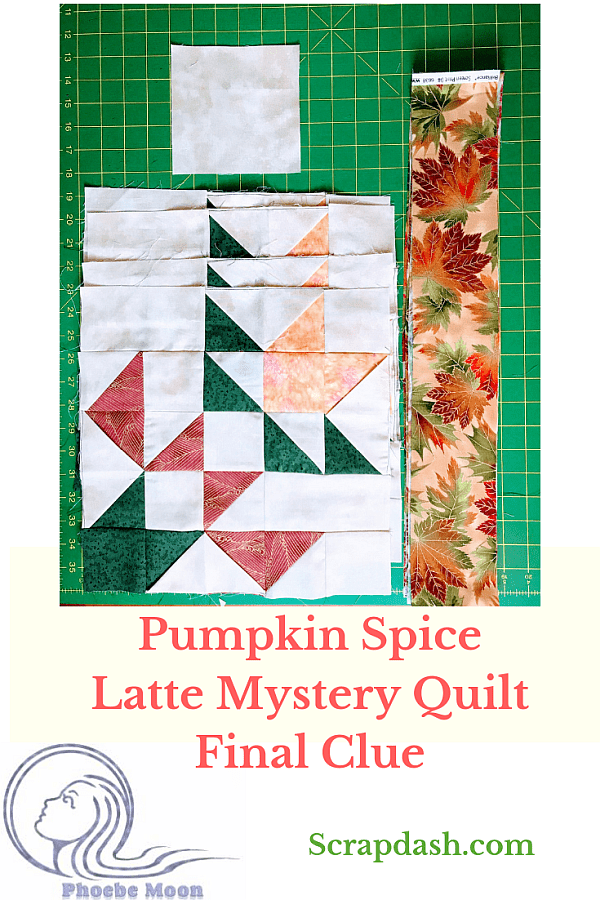
Pumpkin Spice Latte, a Mystery Quilt in Three Dimensions. Final Clue

Creating the Three Dimensional Center and Finishing Options

 You should have four of the Latte blocks.  Now it’s time to add the dimensional center.  Remember the Three Dimensional Bow Tie?  This is the same idea, just on a larger scale.  I call it the Faux Cathedral Window.

If you watched the 2008 video here: https://www.youtube.com/watch?v=DvXUvKIzYZY&t=66s, you probably already know what you are going to do with the remaining 5-1/2″ x 5-1/2″ Background square.

Fold it in half, wrong sides together.  Place it at the lower right corner of the Latte block (the green block), so the cut edges are along the sides and the fold is toward the middle.  Pin it in place.

Graphic showing a step in creating the Pumpkin Spice Latte Quilt

Place another Latte block on top of this one, right side down, matching the green corners.  The folded square is in the middle of the sandwich.

Graphic showing a step in creating the Pumpkin Spice Latte Quilt

Sew the SIDE of this block set.  Open up your block set and fold the two Latte blocks back.   Your folded square should be free standing.

Graphic showing a step in creating the Pumpkin Spice Latte Quilt

Lay this packet on top of the right side of a Latte block so the edge of the  center folded block is on the right edge (the green block) of the Latte block .

Lay the last Latte block right side down on top of that block with the green block in the corner.  Once again the folded square will be the center of that sandwich.  The two Latte blocks that you folded back will be off to the left.

Graphic showing a step in creating the Pumpkin Spice Latte Quilt

Sew down the sides and open up your new unit.  You have just made an odd looking pair of pants.

This next part is a little tricky the first time.  You will need to sew the two sides of the pants into a four-patch by pulling the middle square open to flatten it out.  As you do so you will see the four patch beginning to come together on the back.

Pin the seams in alternate directions, keeping the raw edges of the squished middle square even with the raw edges of the four patch squares.  Sew the four patch and turn the block over.  You have just made a three dimensional square-in-a-square in the center of the four blocks.

Graphic showing a step in creating the Pumpkin Spice Latte Quilt

Did you notice that when you made your square-in-a-square block, the edges of the center square were on the bias?   Roll them in toward the center to create a curved effect.  Either hand stitch or machine stitch them in place.  If you would like, you can insert a 3″ x 3″ square under those rolled edges to get a Faux Cathedral Window look.

Graphic showing a step in creating the Pumpkin Spice Latte Quilt

Your quilt top should now measure 25-1/2″ x 25-1/2″.

Graphic showing a step in creating the Pumpkin Spice Latte Quilt

Here is another option – all those 3D geese have bias edges that can be rolled back.  I am not going to do that on this quilt because I think it makes it look too Christmas-y and I want to add a fall border.

Graphic showing a step in creating the Pumpkin Spice Latte Quilt

You can stop and finish it here if you like.

Graphic showing a step in creating the Pumpkin Spice Latte Quilt

Finishing Options

If you would prefer to make it bigger, you have two options.  The first is to add borders.  It the picture below, I am auditioning the fall border.  It doesn’t look bad!  But I need to keep going…

Graphic showing a step in creating the Pumpkin Spice Latte Quilt

Cut (2) border strips 25-1/2″ x 3-1/2″.  Sew them to both sides of the block, taking care to match the center of the border with the center of the top.  Press to the border.

DO NOT just sew on the border and cut off the excess when you are done!  That is a recipe for wavy  borders, especially in something with as many seams as this block. Forcing the top to match two identically cut borders forces it to lie square.

Cut (2) border strips 3-1/2″ x 31-1/2″.  Sew these to the top and bottom of your quilt top.  Press to the border.

Graphic showing a step in creating the Pumpkin Spice Latte Quilt

How to Set a Quilt Block on Point to Make a Larger Quilt

There is actually a formula for this.  Setting a block on point increases its sizes by the square root of two, 1.414.  If I am estimating a future block size, I usually figure it will increase the block 1.5 times.  So a 10-inch block would become approximately 15 inches.    The finished size of the block you just made is 25-1/2″ square.   Multiplying that by 1.414,  it becomes 36″ if set on point.   You don’t need that number for the next step, it’s just to give you an estimate of size.

The trick to setting a block on point is to remember that all the edges of the final block have to be on the straight of grain.  This means the corner blocks have to start with a square that is cut on the diagonal. The formula for this is: the size of the finished block divided by 1.414 plus 7/8 inch (.875 if you are using a calculator.)

Graphic showing a step in creating the Pumpkin Spice Latte Quilt

For this block, the formula tells us that you will need to cut a 19″ block on the diagonal for two of the four corners.  I suggest that you make it slightly oversize and cut (2) 20″ squares.  Cut those squares on the diagonal to make (4) triangles to use for the corners.  Here you can see that I actually had to put two rulers together to get them to reach the entire diagonal.

Graphic showing a step in creating the Pumpkin Spice Latte Quilt

Sew the two opposing corners to the block first,  taking care to match the center of the triangle with the center of the block.  Press to the triangle.  Sew the remaining two corners and press to the triangle.  You will now have to square up this block.  Take care to maintain the 1/4″ seam allowance.

Graphic showing a step in creating the Pumpkin Spice Latte Quilt

In the picture above, I am matching up the 45-degree angle on my long ruler with the edge of the block.  Because I cut those triangles WAY oversize, I have a bit to cut off.  First I cut to the left, then I turned the ruler over, matched the 45-degree line again, and cut to the right.

Graphic showing a step in creating the Pumpkin Spice Latte Quilt

You can download a chart for setting a quilt or block on point at
https://phoebemoon.com/tutorials/on-point.htm

Adding the Borders

A floating border is a border that “floats” the block away from the border.  It gives the block a little extra space so it doesn’t touch the border directly.

Measure your new quilt top through the center vertically.  It should be 36″, but if not, use your measurement to cut (2) of the 2″ wide floating border strips.  Sew these to both sides of your quilt top, matching the center of your border with the center of your quilt top. Press to the border.

Measure your new quilt top through the center horizontally.  It should be 39″, but if not, use your measurement to cut (2) of the 2″ wide floating border strips.  Sew these to both remaining sides of your quilt top, matching the center of your border with the center of your quilt top. Press to the border.

Repeat this process to add the final borders.

Graphic showing a step in creating the Pumpkin Spice Latte Quilt

You are done!  What do you think?

Please send me a picture if you can.  My email address is  phoebemoondesigns@gmail.com.  I want to brag about you!  In return, I will send you the written pattern for this quilt.

Here is my finished sample.  I am not thrilled with the center.  I may pick it apart and put a bit of the border in the middle, or I may just put a big pot on the center when I use it on the table.  But no matter what, it is done!

Graphic showing the final step in creating the Pumpkin Spice Latte Quilt

Here are the clues:

Please add kris@scrapdash.com to your contacts list to make sure you get the confirmation message. Drag the confirmation message from the Promotion tab to the Primary tab if you use Gmail.

If you are already a subscriber, it’s okay to fill out this form. You won’t be put on the mailing list twice.

Have another tip to offer? Send it to me or reply below and I will add it here.

Don’t forget to sign up for the newsletter! Once a week, I send updates on quilt-related information I have found while wandering the web. This might be an inspiring article, a tip or tutorial I have discovered (or written), and occasionally exclusive offers & discounts as well as immediate access to the secret page of free patterns, guides, and printables. You can follow my page on Facebook, or join the Make Believe Quilters group, too.