Bean There, Week Seven
Note: This post may contain affiliate links. That means we may earn a commission at no additional cost to you if you purchase via our links. Not all links are affiliate links. I only recommend products I use and trust. As an Amazon Associate, I earn from qualifying purchases.
This week, you will be making the
Red Flying Geese
Methods of Making Flying Geese Quilt Blocks
I listed all the different methods of making Flying Geese quilt blocks last month. I am *sure* there are more, but this week we are using the Quilt-in-a-Day Flying Goose Ruler to make 2-1/2″ x 4-1/2″ (unfinished) Flying Geese Blocks. This is my favorite method because it makes units that are too big, and then you square them up. However, I don’t put this method in my patterns because it requires a special ruler.
Items you might like to have on hand
- a large Quilt-in-a day Flying Geese Ruler
- Invisigrip for the back of the ruler
- rotating cutting board
- sharp pins (applique or patchwork)
- Best Press
Making 32 Flying Geese Blocks Using the quilt in a day (four at a time) Method
Assemble:
- (8) 7″ White squares
- (8) 5-1/2″ Red squares
In this method, you work with much larger pieces until the flying goose unit is completed, and then you trim it with a Large Quilt in a Day Flying Geese ruler.
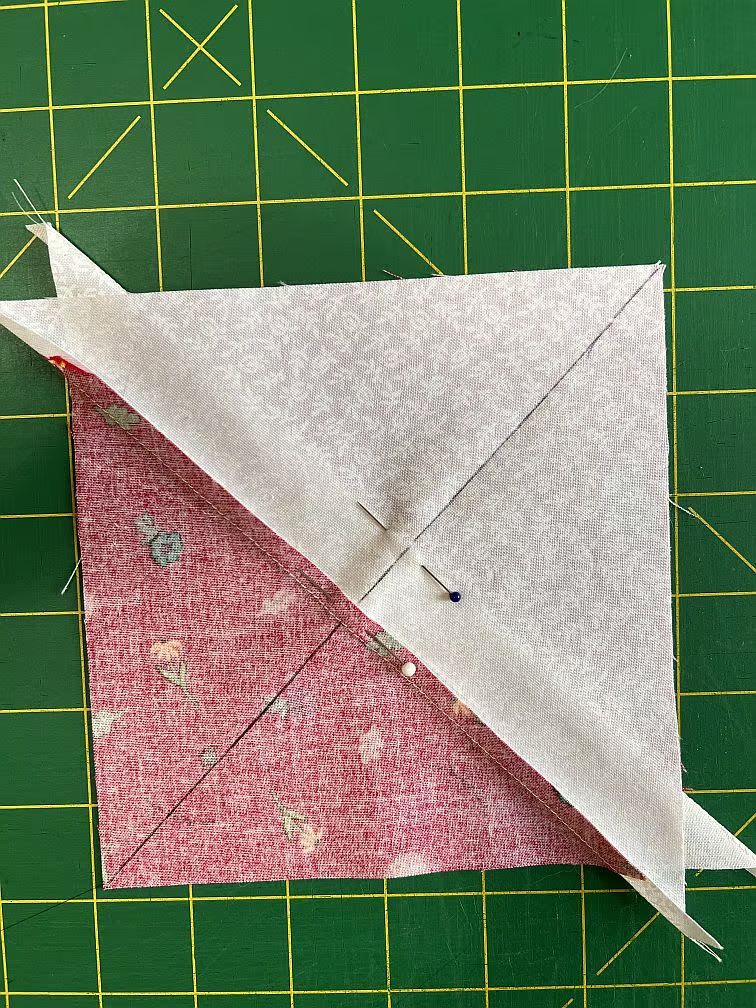
Start with a 7″ square white fabric. Lay on top of that a 5-1/2″ red square, right sides together and roughly centered on the larger square. Draw a line through the diagonal of both squares. Pin carefully, then sew 1/4″ on either side of the diagonal. Cut on the line and press to the larger triangle.


Lay your two odd shaped squares on top of each other, right sides together, matching the corners of the smaller
triangle with the corners of the larger one. The seams WILL NOT touch each other.
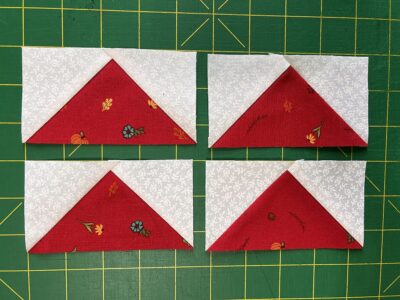
Once again, draw a line on the diagonal (crossing the center seam) and sew 1/4″ on either side of the line. Cut on the line. You should end up with a unit that looks like the one to the bottom right. Make a small clip in the center so you can press both sides away from the goose. Now just cut this unit in half, pressing to the white.


Square it up using the Flying Geese ruler. Use Omnigrip on the back to keep it from slipping. You will make (4) Flying Geese Units.


A rotating mat comes in very handy! Make (32) Flying Geese blocks with Red in the middle.
pay no attention to the man behind the curtain
As long as I had all these blocks made that were going to be cut up into Flying Geese units anyway, I figured I would experiment a bit. First I tried the Wing Clipper ruler.


Not bad, but I would recommend that you follow their directions.
Then I tried a 4-1/2″ ruler. I didn’t like this so much. It was hard to get both the middle of the Flying Goose unit AND the 1/4″ seam allowance. It was do-able, but not my favorite.


I figured for sure that I would like the 4-1/2″ square up ruler.


I was wrong. It was easier to see the seam allowance, but almost impossible to figure out the middle of the block. And if you are yelling at me not to cut that block because I would cut off the point, let me assure you that I paid no attention to you. I cut it off anyway. I tried to salvage it, but ended up cutting a new block. Thus ended my experiment.
That’s it for this week!
Sewalong Schedule
- Introduction
- Week One: 5/10/25. Making HSTs with Magic
- Week Two: 5/17/25. Three Methods of Making the Cat’s Cradle block.
- Week Three: 5/24/25. Making the Cat’s Cradle Red Blocks
- Week Four: 5/31/25. Making the Cat’s Cradle Green Blocks
- Week Five: 6/7/25. Catchup and Cutting Ahead
- Week Six: 6/14/25. Ten Methods of Making Flying Geese Blocks
- Week Seven: 6/21/25. Making More Flying Geese
- Week Eight: 6/28/25. Catchup and Sewing Ahead
- Week Nine: 7/5/25. Finally putting the blocks together
- Week Ten: 7/12/25. Adding the borders and finishing. Whew!
If you would prefer to work from a pattern, it is available here.