Quilt Qwazy – a Quilt you Stack, Slash, Shuffle, and Stitch!
Note: This post may contain affiliate links. That means we may earn a commission at no additional cost to you if you purchase via our links. Not all links are affiliate links. I only recommend products I use and trust. As an Amazon Associate, I earn from qualifying purchases.
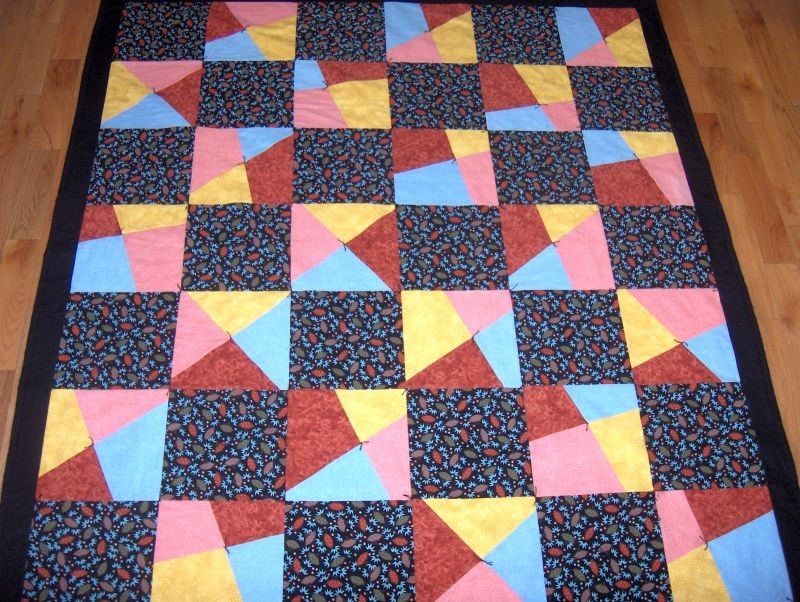
A Stack N Slash quilt is the easiest way ever to make a quilt of many colors. Gather a coordinated set of fat quarters, or just use scraps. Stack, Slash, Shuffle, and Stitch! It’s fun and easy. It gives a great improvisational look without cutting lots of individual strips, wasting fabric, fussy cutting, or sewing small pieces. It’s a great quilt to make when you want to relax and play with colors.
The pattern is available for free to subscribers at the bottom of the page. If you’d rather just print, click the green Print Friendly button under the designer list. If that doesn’t work, try Ctrl + P (or Flower + P) to bring up the printer dialog box.
Stack N Slash
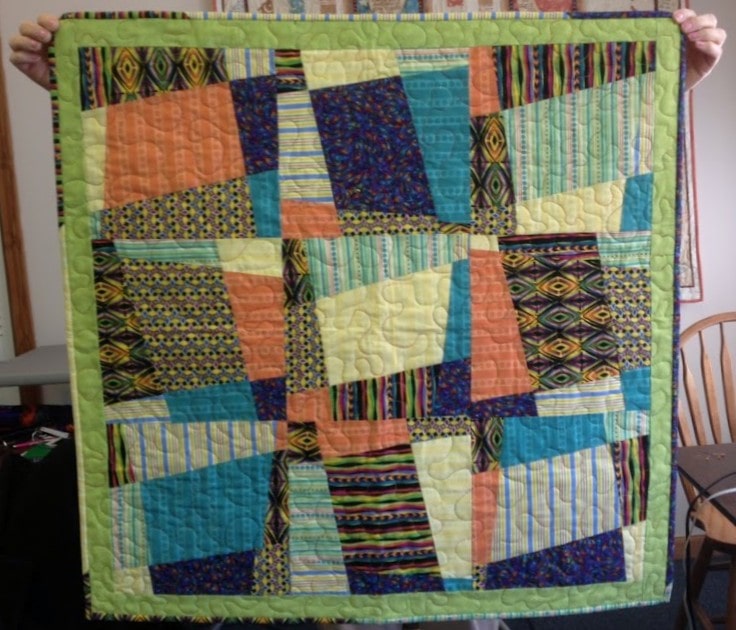
Here is the idea: To make the quilt above, you would start with 12 different fabrics, cut into squares. There should be a good mix of values and print sizes. If you are using fat quarters, cut them into 18″ x 18″ squares and set aside the 4″ x 18″ leftover strip to use in the border or in another project.
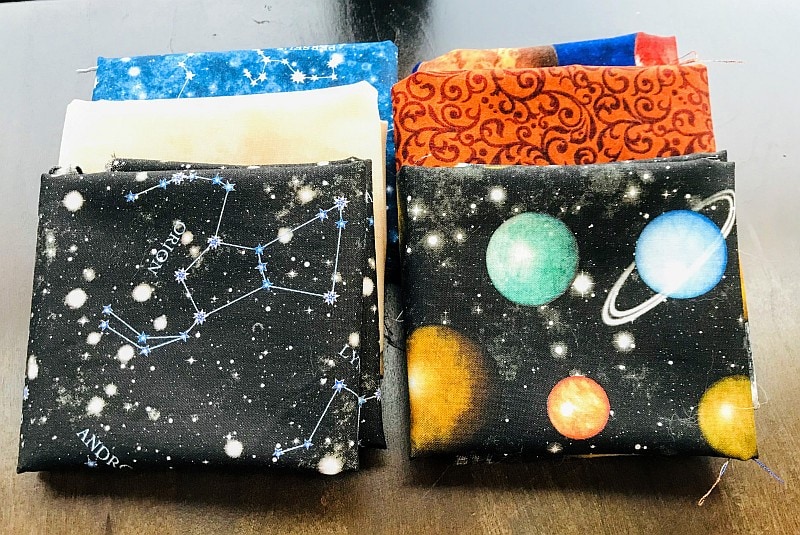
For this tutorial, I am only using 6 fat quarters, which I will be trimming to use as a border for a panel quilt. I saw this panel last year:
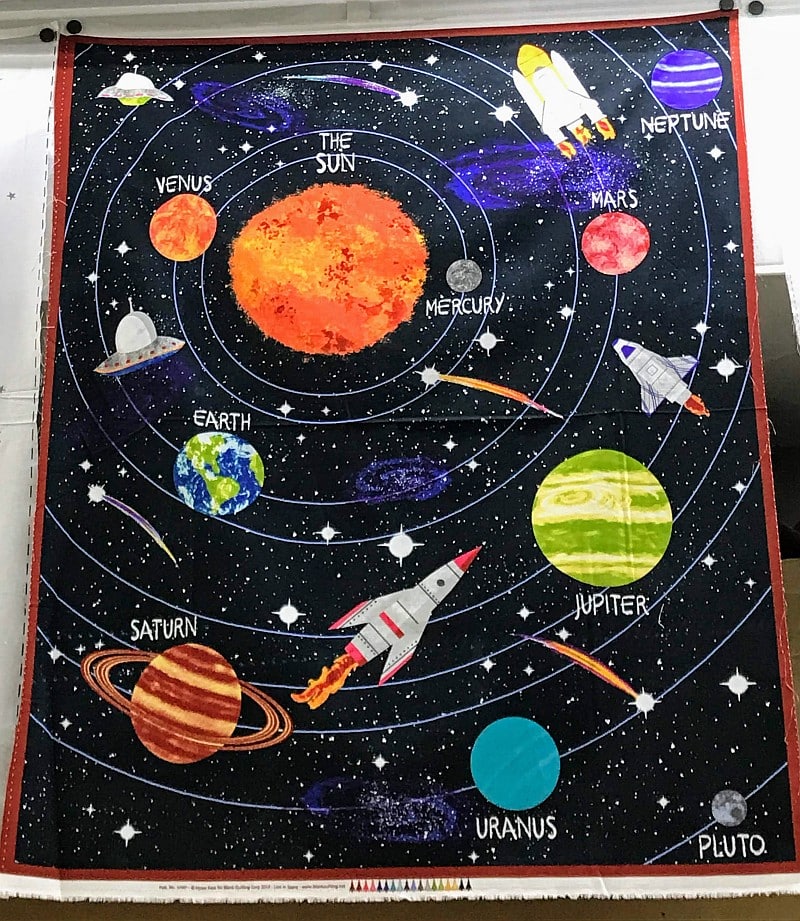
My grandson is a space nut so I have no doubt he will like this panel. I like it because it has Pluto on it. Did you know that from the time Pluto was discovered to the day it was demoted from planet status, it had not even taken one revolution around the sun?
Here are the fat quarters I chose to go with it. You can find similar ones here.
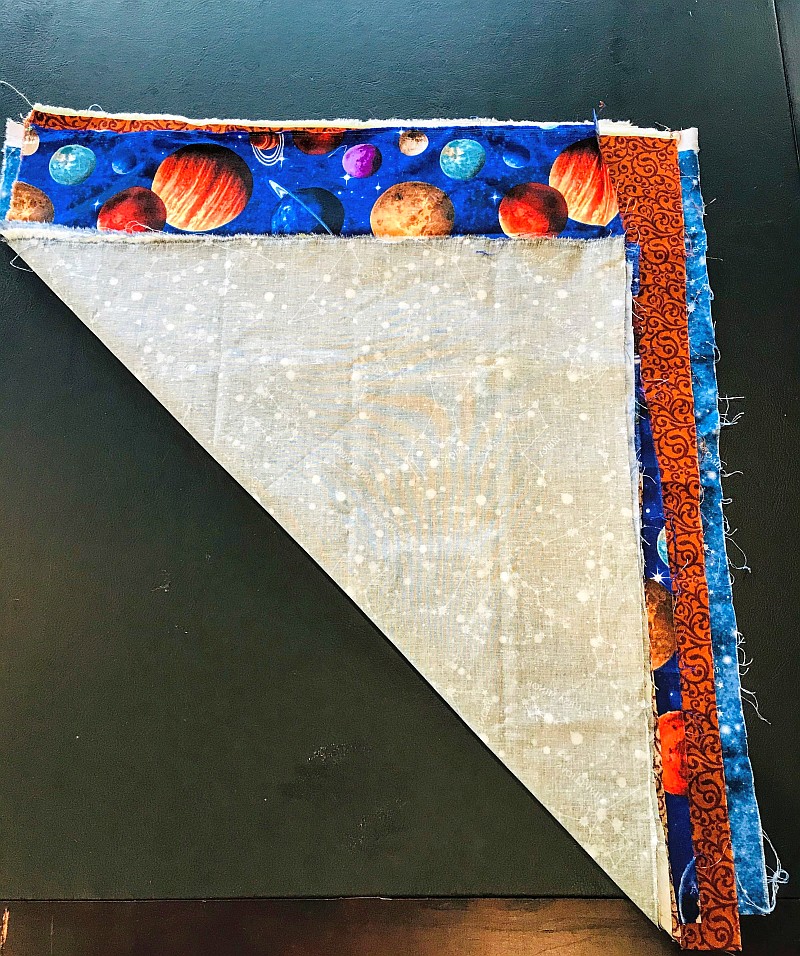
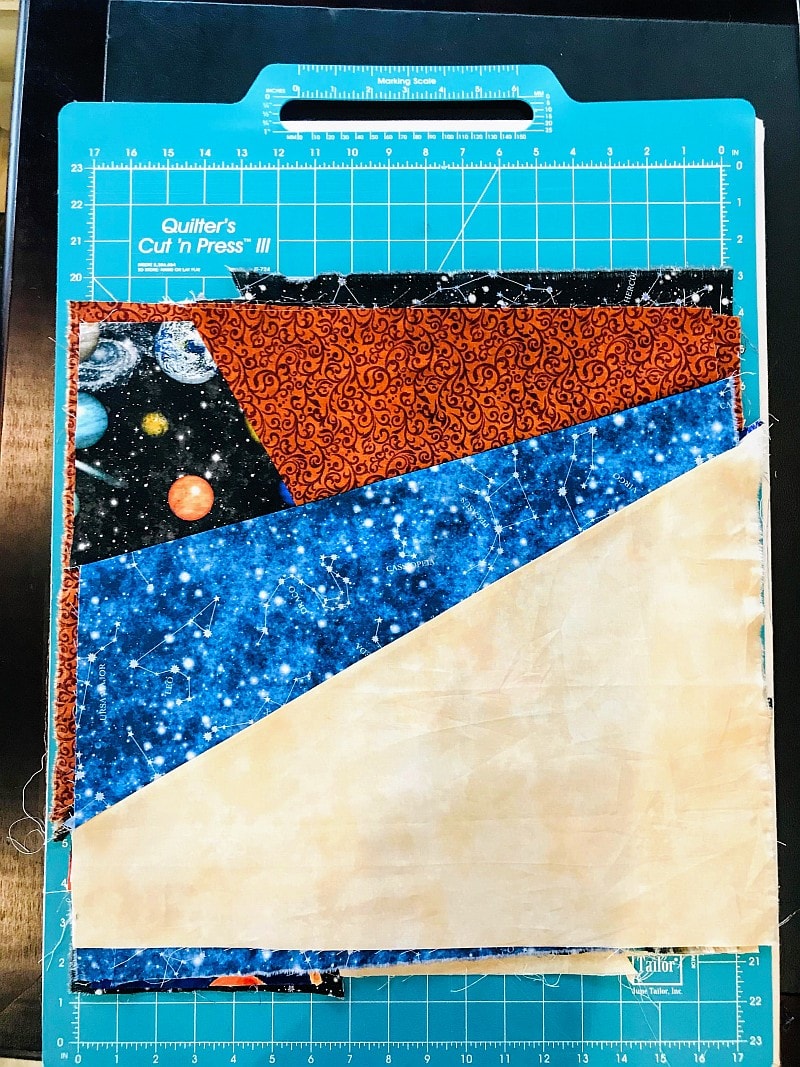
I laid them out, then folded the bottom up to make an 18″ x 18″ square. I kept the piece that I cut off the top. I will eventually be making my blocks into a long border. I might be able to use it, who knows?
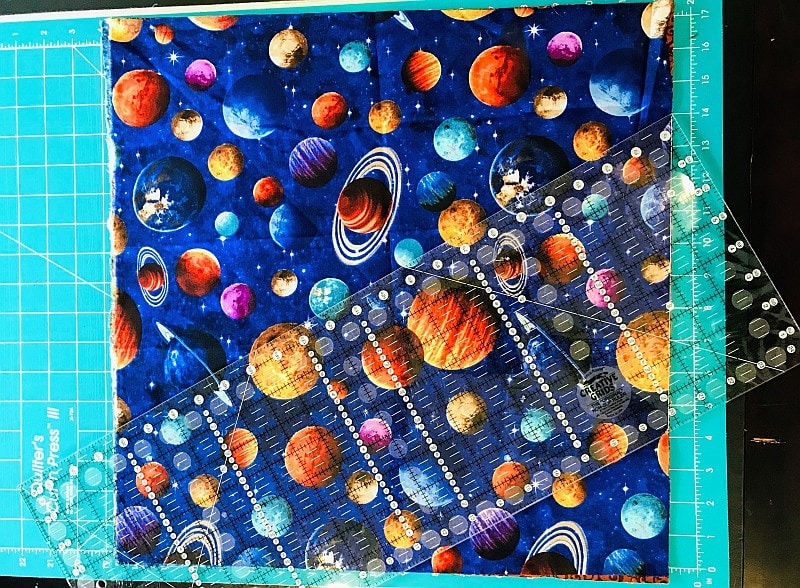
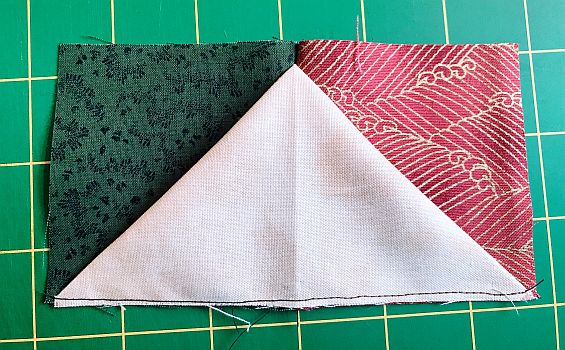
Place all your fabrics in a pile, all face up. Throw a ruler on top of the pile and make a cut wherever it lands, using a 60mm rotary cutter with a new blade. (Hence the name Stack N Slash.)
After this cut, remove a fabric piece from the top and place it at the bottom of the pile of similar cuts. Pick up the two new top pieces and sew them together. Don’t worry about your seam allowance. You will square up this block later. Press the seam open.
Repeat for all blocks. Place these blocks in a new pile, turning some of them 45 or 90 degrees so all the seams don’t lay exactly on top of each other. Keep them all face-up.
I am using the Quilters Cut ‘n Press III in the picture because of its size. That’s a cutting mat on one side with a pressing mat on the other. VERY handy, especially in small spaces. As I type this, it is on sale at Sewing Machines Plus for $39.98.
Once again, throw a ruler on top of the pile. You can nudge the ruler a little bit if you don’t like where it lands, but don’t stress over this too much. The beauty of this system is the randomness of the pattern.

Cut and remove a top fabric piece and place it at the bottom of the pile on the same side. Pick up the two new top pieces of fabric and sew them together. Press the seam open.
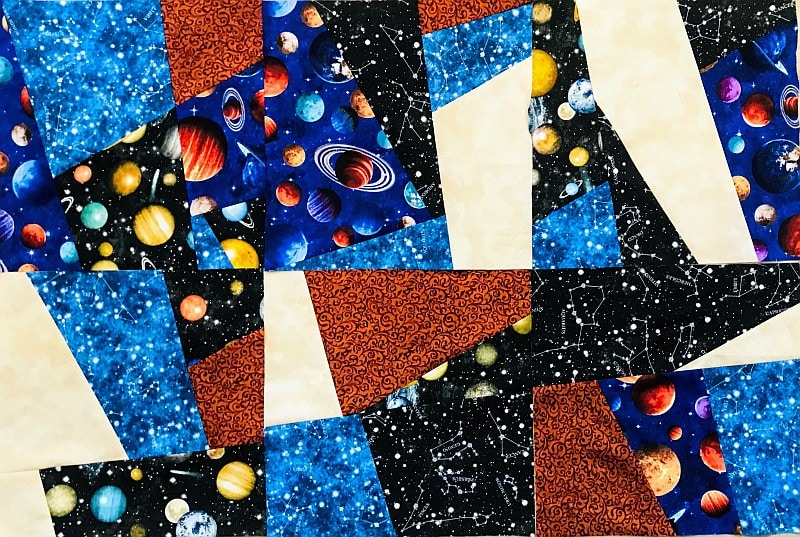
Because of the way, you twisted and turned the blocks, you will now have completely different blocks. Some will have four fabrics and some won’t. Some will have large pieces of just one fabric and some won’t. The one thing these blocks will have in common is very odd edges. They will not be straight. Don’t worry about it, you are doing okay.
Keep Going…
One more time, pile up all your blocks face up, turning some of them to the left and some to the right. Make one more random slash, then move the top fabric piece to the bottom and sew all blocks. Press the seams open.
By now, your 18″ squares are anything but square! Pick a good average number and square them all up to that size. They will most likely be about 14″ square. To make a quilt, just arrange them in rows doing the best you can to keep like fabrics from touching.
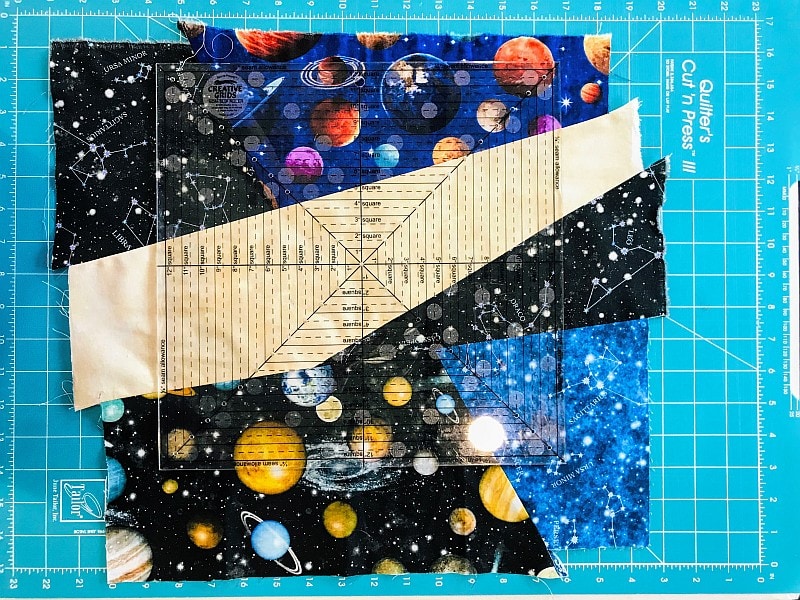
Since I am making a 12″ wide border, I used a Creative Grid Fussy Cut ruler to square up the blocks. I tried to position it so that no one single fabric was too obvious. And, yes, I saved all those extra fabrics, too!
To make a thinner border, I could have cut them in half to make a 7″ x 14″ (or thereabouts) rectangle, then sewn these rectangles in rows with sashing between. If you would prefer a different sized rectangle, just sew a strip on one end. Who is going to know?
Here are my six blocks, put together but not sewn. I will be making a 12-1/2″ x 72-1/2″ border with them.
Twist N Turn Variations
Please note: all these variations require a good 1/4″ seam allowance.
If you are using more (or less!) than 12 different fabrics, you might prefer to vary the number of fabrics moved to the bottom after each cut. If you are making controlled cuts, move one piece to the bottom with the first cut, two pieces on the second cut and three pieces on the third cut. This will help you keep your fabrics from matching. Remember, those seams do not have to match!
You don’t have to use all cotton fabrics —consider leftover dress fabrics, corduroys, denim, chenille, velvet, old towels or upholstery samples. This is a great method to use to make sturdy tote bags. Embellish with old buttons, twine, ribbon, lace or what-have-you.
Try this:
Before sewing the two fabrics of each block together, create a flange by inserting a 1″ strip of black fabric, folded wrong sides together, into the seam. After you have sewn through all four layers, that flange will be standing up about 1/2″ between the two halves of the block. Press it to one side and secure it with a matching thread. It will give the effect of a stained glass window. Because this flange is actually inserted into the seam, it will not make this block any bigger. It does make it bulkier.
You can do the same thing with a little less dimension by sewing a 1-1/4″ wide strip of black fabric to each side of the block fabrics before sewing. This technique will make the block slightly larger. If you use this technique, you may prefer not to twist-and-turn after each cut. Keeping the cuts and the stained glass strips even will keep the blocks all the same size. You can put these blocks into a quilt using 2″ black sashing. Or not. It’s up to you!
Other ways to make your quilt bigger would include adding sashing or a border.
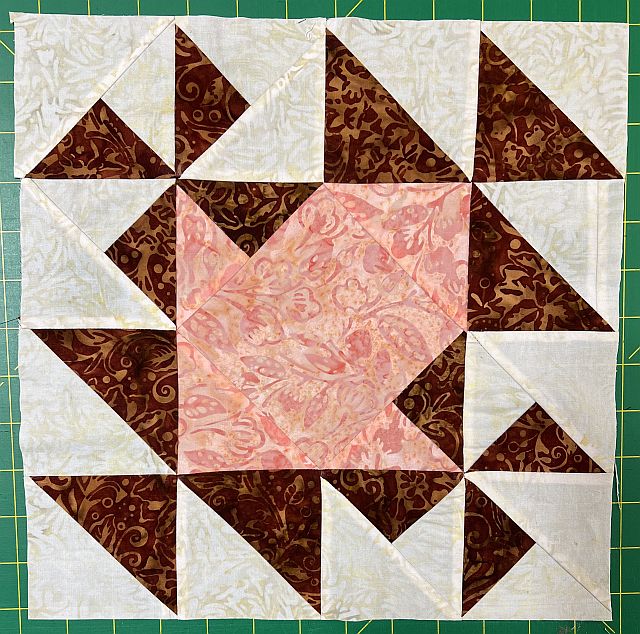
Here is a controlled Stack N Slash with alternate Blocks:
To make a quilt with sticks, just start with blocks that are pieced with a small strip in the center. Treat them as if they were whole, uncut blocks. You may want to just slash these blocks twice.
One last suggestion: why not give the special embroidery stitches on your machine a try? You have all those nice, flat open seams to embellish. Put your foot down, push a button, and let ‘er rip. If you don’t like the effect, you can always sew a button over it.
Please add moc.hsadparcs@sirk to your contacts list to make sure you get the confirmation message. Drag the confirmation message from the Promotion tab to the Primary tab if you use Gmail.
If you are already a subscriber, it’s okay to fill out this form. You won’t be put on the mailing list twice.

What a fun technique! I love the result you got. Thanks for all the instructions.
What an interesting idea! I have never seen this before and appreciate your instructions. Thanks for sharing!
I have wanted to try this technique. Thanks for the tutorial. Thanks for continuing to blog and thanks for hopping!
This looks like a great learning experience. Thanks for the tutorial. So many of us have time on our hands this month to give it a a try. Timing is everything.
When I saw it was from you Kris, I knew right away it would be fun. I’m still neck high with my secret sewing, but next week I’m going to take a little break and play with this one. How do you think it would look if I was using just reds and pinks?
Oh man, how cool is that, and I love the idea of playing with all different types of fabrics. With so many of us stuck inside, what better time to play. Thanks for the awesome instructions. My mind is spinning with ideas! You have made us smile from ear to ear!
What a fun way to create a quilt…thanks for sharing!
Very pretty! I have one at home that is all red and pink cat fabrics – I wish I could show you. I made the blocks 14″ x 14″ and the whole thing has a border. I used 12 FQs so it came out larger. Fun kitties.
This is a really fun idea. Thanks for the instructions and sharing your project!
How cool this is, it’s great to see this technique… I am really wanting to try this myself, thanks for the awesome tutorial and tips even the layouts Kris… Totally Cool!!
What a wonderful tutorial, love the end results…thanks so much
Thank you for sharing this great stash buster method of quilting. I usually have large scraps left and hate to throw them away. This is the perfect pattern for them. Love your tips and ideas. A stained glass quilt (maybe Christmas fabrics) would be lovely. Thank you for the smiles and inspiration!
Thanks for sharing your project! It looks fabulous.
Great quilt.
This is a great way to make a quilt! Thank you for the tips and tutorial. I’m thinking a stained glass quilt (Christmas fabric?) using your technique would be so special. Thank you for the inspiration!
Great way to make a quilt – thanks for the tut!
I thought I had really messed up. I tried cutting correctly, using 1/4 inch seams, and nothing was orderly. What strange shapes I had and not a finished neat square. After going back and rereading, I see your warnings and squaring.
Yup! I cut this sample much too small but that was based on the fact it’s becoming a border. Usually 18” sets of fabric ends up being a 14” square.
Now that’s a Qwazy quilt but sounds like so much fun. Thanks for the download and the tut to make it. Hope you’re not too Qwazy with the quarantine.