A Batty Pumpkin Quilt Block
Note: This post may contain affiliate links. That means we may earn a commission at no additional cost to you if you purchase via our links. Not all links are affiliate links. I only recommend products I use and trust. As an Amazon Associate, I earn from qualifying purchases.
Here’s the Batty Pumpkin Quilt Block for the Halloween series. Be sure to check out the full list of designers at the bottom of the page.
The pattern is available for free to subscribers at the bottom of the page. If you’d rather just print, click the green Print Friendly button under the tutorial. If that doesn’t work, try Ctrl + P (or Flower + P) to bring up the printer dialog box.
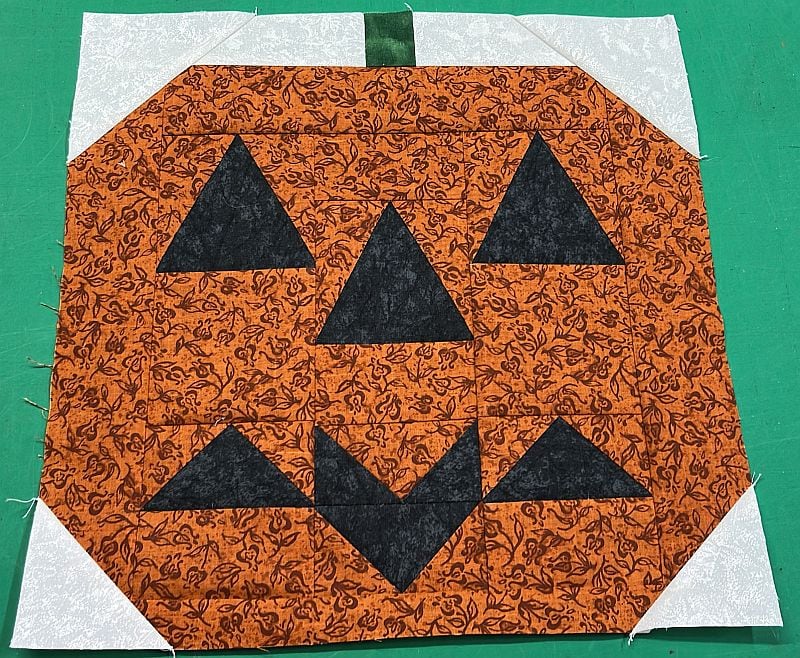
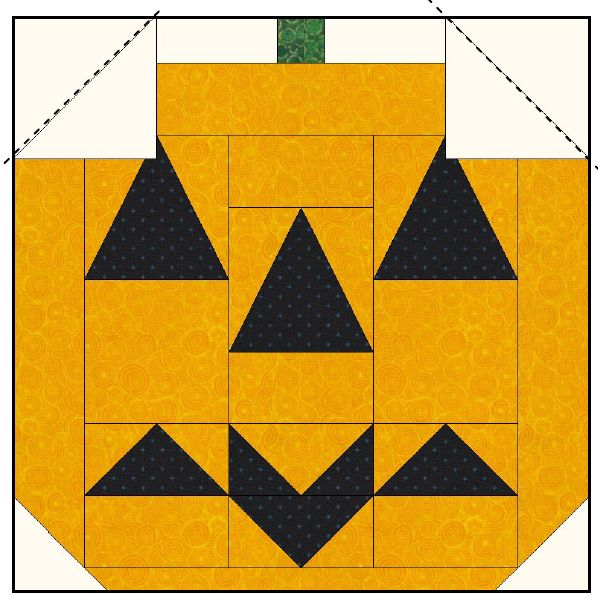
The Batty Pumpkin Quilt Block is a spooky quilt block! This 12″ pieced block is using a bat for his distinctive smile. Or is it a grimace? Here is one made by Kelly M.
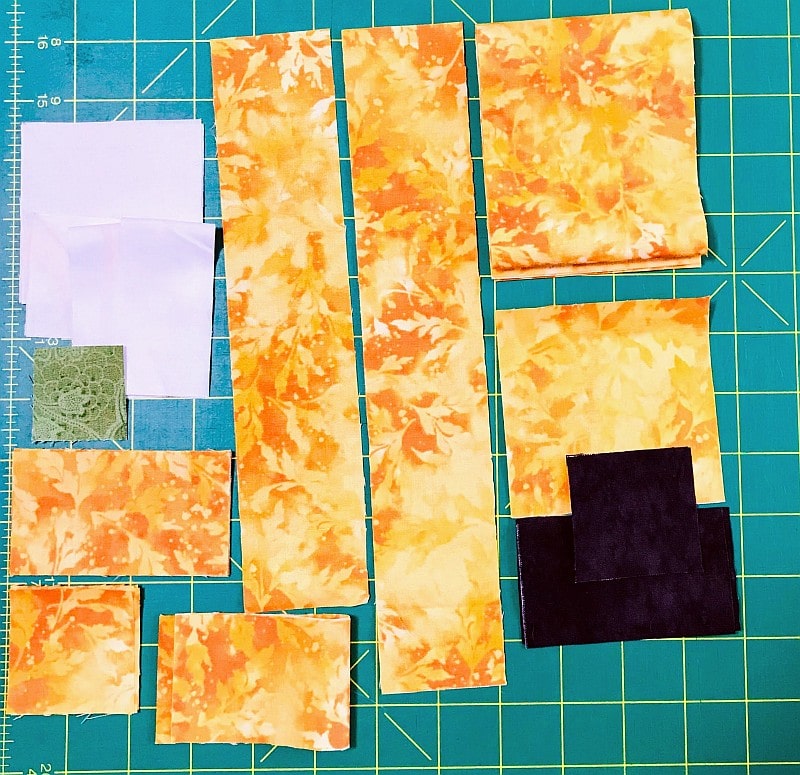
Fabric Requirements & Cutting Instructions
- 1/4 yd Orange
- 1/8 yd Black
- 1/8 yd Background
- Tiny Scrap Green
This tutorial uses a Tri-Recs ruler. There are other Triangle-in-a-square rulers that cut the same block. If you prefer one of those rulers, alter the cutting directions to fit that ruler.
Before beginning, this or any other project, wash and press your fabric. Take the time to clean your machine, put in a new needle, and fill a few bobbins.
To press, just hold the iron over a spot for a moment or two. This pattern assumes a perfect 1/4” seam. All strips are cut by Width of Fabric (WOF.)
- Orange
Cut (2) strips 2″ wide by the WOF. From those strips, cut (1) rectangle
2″ x 9-1/2″, (5) rectangles 2″ x 3-1/2″, (2) 2″ x 11″ rectangles, (6) 2″ x 2″ squares and (1) 1″ x 12-1/2″ rectangle.
Cut (1) 3-1/2″ wide strip. From that strip, cut (2) 3-1/2″ squares and set aside the rest to be used for the Triangle-in-a-Square quilt block.
- Black
Cut (2) 3-1/2″ wide strips by the WOF. From those strips, cut (3) 2″ x 3-1/2″ rectangles, (2) 2″ x 2″ squares and set aside the rest to be used for the Triangle-in-a-Square Quilt Block
- Background
Cut 1 strip 3-1/2″ wide by the WOF. From that strip, cut (2) 3-1/2″ squares, (2) 2-1/2″ squares and (2) 1-1/2″ x 6″ rectangles.
- Green
Cut (1) square 1-1/2″ x 1-1/2″.
Making the Flying Geese
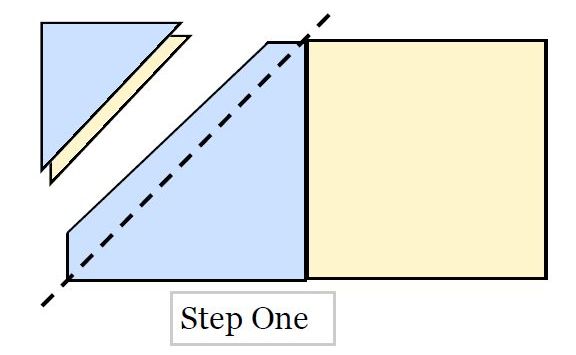
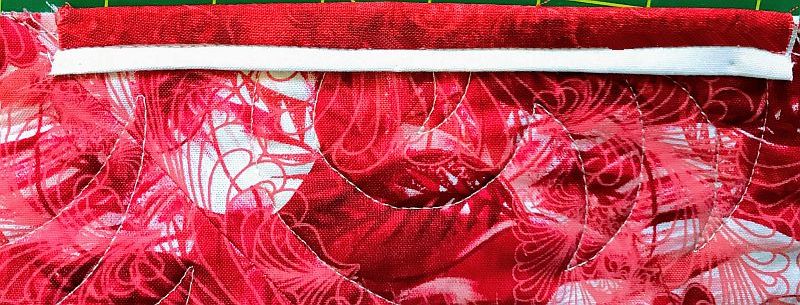
This is a traditional method of making Flying Geese Blocks. In this method, you sew a square on one side of a rectangle using a diagonal seam, then flip it over to create one side of the Flying Goose block. Press to the sky. After you have double-checked to make sure everything lines up properly, cut off the excess underneath that square. Then repeat the process for the other side.
To use this method, cut a rectangle for the goose and two squares for the sky. Cut the squares for the sky the same size as the height of the unfinished rectangle. Remember that the finished size will be 1/4″ smaller all the way around the rectangle due to the seam allowance. In other words, a 2″ x 3-1/2″ rectangle will be needed to make a 1-1/2″ x 3″ finished goose.
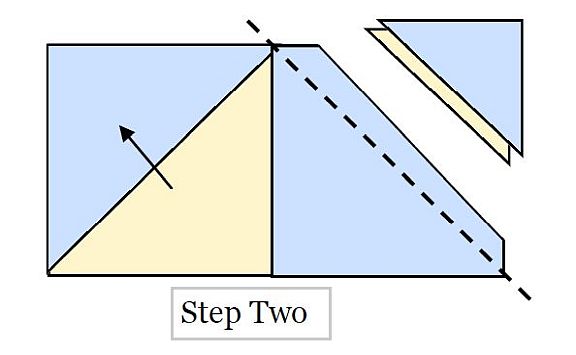
Make a sample block first. Draw a line on the diagonal on the wrong side of the sky square (shown in blue below.) Lining up the corners of the square with the edges of the goose rectangle (shown in yellow below), pin carefully and sew on the drawn line as shown. Cut off the excess and press. Do the other side, overlapping the first square. Press and trim all dog ears.
Making the 4 Flying Geese Quilt Blocks
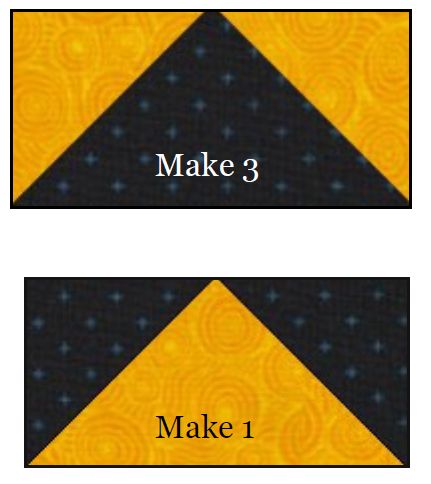
Assemble:
(6) 2″ Orange Squares
(2) 2″ Black Squares
(1) 2″ x 3-1/2″ Orange Rectangle
(3) 2″x 3-1/2″ Black Rectangles
Following the directions above, make (4) Flying Geese Blocks, (3) with Black geese, and (1) with an Orange goose. Press and square up to 2″ x 3-1/2″ if necessary. If you have the Quilt-in-a-Day Mini Geese ruler set, you can use that to square up your blocks. A rotating mat will also be very helpful here.
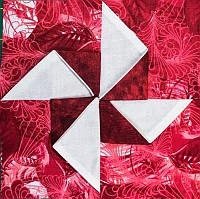
Making the 3 Triangle-in-a-Square Quilt Blocks
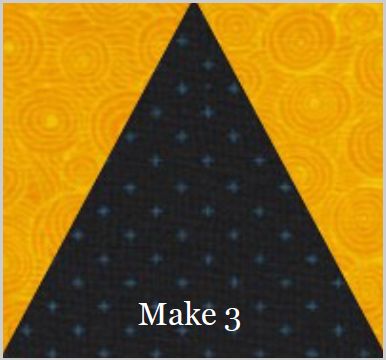
Assemble:
(1) 3-1/2″ wide Orange strip
(1) 3-1/2″ wide Black strip
In this pattern you will be using a specialty ruler, called a Tri-Recs to make the Triangle in a Square block. (You can also use the V Block Ruler.) This block measures 3-1/2″ x 3-1/2″ unfinished.
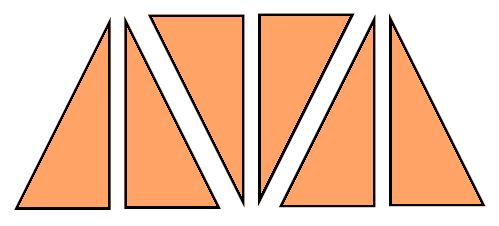
A Tri-Recs ruler actually has two pieces. There is a large isosceles triangle piece (which makes the center of the point block) and a half-triangle piece (which will make the two sides.) Because there is a right and left side of this block, you will need to cut both a right and left half-triangle piece.
To cut this block using the Tri-Recs ruler, align the square edge of the ruler with the edge of the strip along the strip size line on the ruler.
This isn’t my video, but you can see how it is done below.
Using the 3-1/2 wide Black strip, cut (3) triangles.

Using the smaller ruler and the 3-1/2″ long Orange strips, cut the half-triangle sides. Make sure that you
clip that little corner on the ruler. It helps you line up the pieces later on.
Fold your strip in half wrong sides together before cutting. That way, you will automatically be cutting
both the right and left sides of this block. Cut 3 pairs (6 triangles.)
The piecing of this block is tricky the first time. I suggest you make a practice block first. Lay the right side triangle on the center triangle, right sides together. That little snipped triangle will be on the lower right-hand side. It should line up with the bottom of the block exactly. When you sew the two triangles together using a 1/4″ seam allowance, the seam should go through the point of the snipped edge.
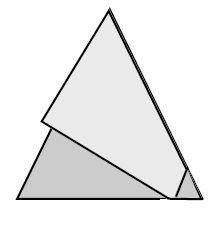
Open this unit and press to the outside triangle gently. (In this particular block, you will be pressing to the light.) Does it seem to line up properly? If so, add the left side block using the same seam allowance.
Open up the block again, press and measure. It should be 3-1/2″ x 3-1/2″. Square it up if necessary.
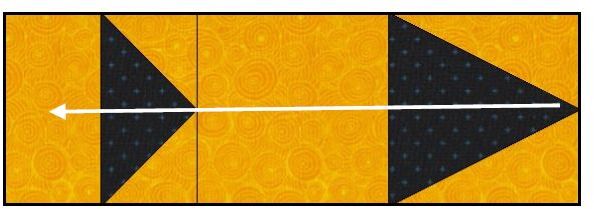
Making the Center of the Batty Pumpkin Quilt Block
This block is made almost like a quilt. First you make the center, then you add the borders. To make the center, sew the block units in columns and press as shown below. The center will be 9-1/2″ square.
Assemble:
- (1) Black–Centered Flying Goose Block
- (1) Triangle in a Square Block
- (1) 3-1/2″ Orange Square and
- (1) 2″ x 3-1/2″ Orange Rectangle
Sew this block as shown and press to the left.
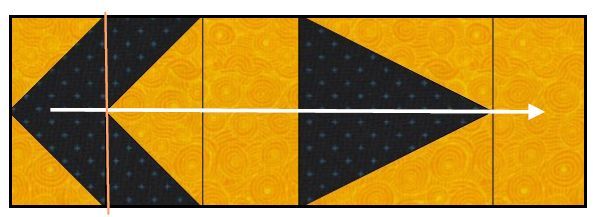
Assemble:
- (2) Flying Geese Blocks, one of each color
- (1) Triangle in a Square Block
- (2) 2″ x 3-1/2″ Orange rectangles
Sew this block as shown and press to the right.
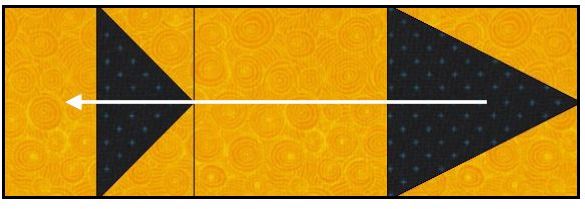
Assemble:
- (1) Black-Centered Flying Goose Blocks
- (1) Triangle in a Square Block
- (1) 3-1/2″ Orange Square and
- (1) 2″ x 3-1/2″ Orange Rectangle
Sew this block as shown and press to the left.
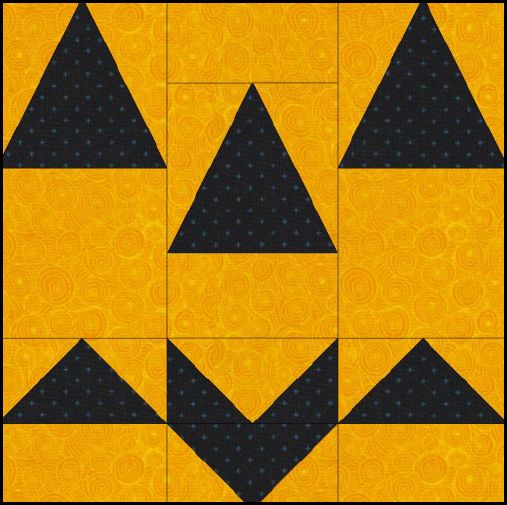
Sew the three columns as shown to make the face. Because of the way you pressed the seams, they should just touch each other at the intersections. Use pins to encourage this behavior if necessary.
Your block should measure 9-1/2″ x 9-1/2″.
Making the Stem
Assemble:
(2) 1-1/2″ x 6″ Background rectangles
(1) 1-1/2″ Green square.
Sew the Green square between the two Background rectangles. Press to the square.

Making the Pumpkin
Assemble:
(1) 2″ x 9-1/2″ Orange rectangle
(2) 2″ x 11″ Orange rectangles
(1) 1″ x 12-1/2″ Orange rectangle
(1) Stem unit
Sew the 2″ x 9-1/2″ Orange rectangle to the top of the block and press to the rectangle.
Then, sew a 2″ x 11″ Orange rectangle to both sides and press to the rectangle.
Sew a 1″ x 12-1/2″ Orange rectangle to the bottom of the block and press to the rectangle.
Finally, sew the Stem to the top of the block and press to the block. It should measure 12-1/2″ square.

Assemble:
(2) 3″ Background squares
(2) 2″ Background squares
Draw a diagonal line on the back of all the squares. Place the two 3″ squares on either side of the top of the block as shown. Just as you did with the Flying Goose blocks, sew on the line and fold the block to the corner. If it lines up perfectly, you can trim the excess.
Do the same thing to the bottom of the block using the 2″ background squares. Press and square up to 12-1/2″ if necessary.
You are done! Enjoy your batty pumpkin! Send me a picture if you can!
Here are other Halloween ideas:
- Boo!-ti-ful Halloween Wall Hanging or Lap Quilt
- Halloween Hoppin’ – Using Purple in a Halloween Quilt
- Halloween Freebie – Spiders in My Attic
- Ghastly Ghouls and Zombies
- A Batty Pumpkin Quilt Block
- Free Braided Table Topper Pattern for Halloween
- Orange You Glad Harvey?
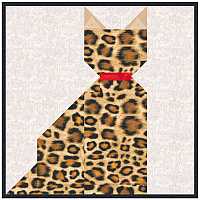
- Boo! A Fussy Cut Monster Mash Quilt Block
- Standing Bag Pattern
- A Quilted Halloween Story
- A Cauldron Quilt Block
Please add moc.hsadparcs@sirk to your contacts list to make sure you get the confirmation message. Drag the confirmation message from the Promotion tab to the Primary tab if you use Gmail.
If you are already a subscriber, it’s okay to fill out this form. You won’t be put on the mailing list twice.


This is so adorable — thank you!!
The construction of this block is so clever!! Love it!
This is so clever! Thank you so much for the detailed instructions, which look easy to follow.
Under cutting for the Orange, it says, “Cut (1) 3-1/2″ wide strip. Cut (2) 3-1/2″ squares and set aside the rest to be used for the Triangle-in-a-Square quilt block.” Does that mean to cut the (2) 3-1/2″ squares from the 3-1/2″ strip or is that in addition to cutting the strip?