Sparkling Snowflake – January #QuiltBlockMania
Note: This post may contain affiliate links. That means we may earn a commission at no additional cost to you if you purchase via our links. Not all links are affiliate links. I only recommend products I use and trust. As an Amazon Associate, I earn from qualifying purchases.
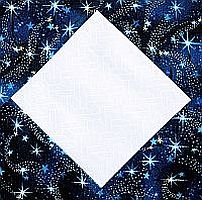
Here’s a Sparkling Snowflake for the #QuiltBlockMania Blog Hop. Be sure to check out the full list of designers at the bottom of the page.
To print this page, click the green Print Friendly button under the designer list. If that doesn’t work, try Ctrl + P (or Flower + P) to bring up the printer dialog box.
The Sparkling Snowflake Quilt Block

This is an easy block that finishes to 13″ as shown. If you want a 12″ block, just eliminate the center sashing.
You will need:
- (1) 10″ White square (for the Magic 8 HST method)
- (8) 3-1/2″ White squares for the corners of the block
- (4) 1-1/2” x 6-1/2” White rectangles for the sashing
- (1) 10″ Blue square (for the Magic 8 HST method)
- (8) 2-1/2″ Blue squares for the center signature blocks
- (1) 1-1/2″ Blue square for the center cornerstone.
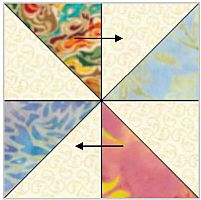
Start by making (8) 3-1/2″ HSTs. I suggest the Magic 8 method, although you could use the Traditional Method as well.
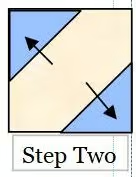
The center signature blocks are a three step process.
First, draw a diagonal line on the back of all the 2-1/2″ blue squares. This will be your sewing line. Place a 2-1/2″ square right sides together in the corner of a 3-1/2″ White square so the diagonal line touches the two sides. Sew on the line.
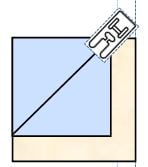
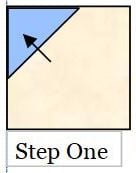
Step One: Flip the small square over the seam. The two corners should touch. If they do, you can trim this seam to 1/4″. If not, unpick the seam and try sewing just a tiny bit to the side. Press.
Step Two: Do the same thing to the other side. Trim, press to the dark and square up to 3-1/2″ if necessary.
Putting the Block Together
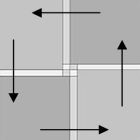
Sew the (2) HSTs, (1) 3-1/2″ White square and (1) signature block into a four-patch as shown below. Press the block seams in opposite directions so they don’t overlap, or you can twirl them.
To do that, finger press the seams so they go around in a circle. You will need to pick out a couple of stitches at the intersection to get these twirled seams to lay flat. You know you have done it right if you see a teeny tiny four patch made by the right side of the fabric at the intersection.
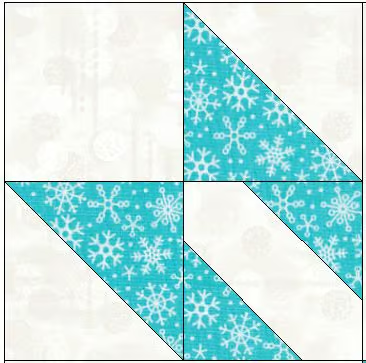
Sew the sashing between two blocks, rotating one to make the design shown. Press to the sashing. Make (2) rows like this.
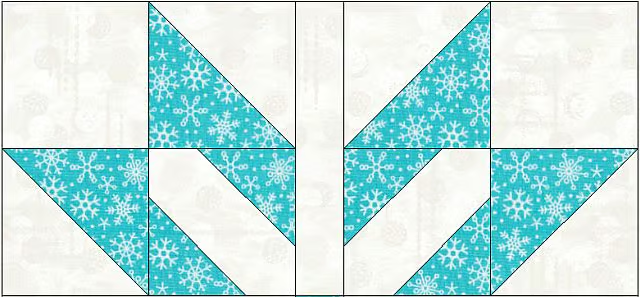
Sew the 1-1/2″ Blue cornerstone between (2) 1-1/2” x 6-1/2” White rectangles. Sew this unit between the two rows you made above, rotating the second one to make the design.

And you are done! Give your block one final press from the back so you can fix any accidentally twisted seams. Enjoy!
Other Designers
- Snowy Scene by Carolina Moore
- Sparkling Snowflake
- Winter Hat by Crafty Staci
- Snow Angel Quilt Block Snowflakes w/letters by Appliques Quilts and More
- Snowman by Memory Barn Studio
- Snowman by Katie Mae Quilts
- Falling Snow by QuiltFabricationSnowflake by The Quilted Diary
- Build a Snowman by Tamarinis
- Snow Drift by Studio B
- Frosted Branches by Tourmaline & Thyme Quilts
- Strings Attached by Patti’s Patchwork
Don’t forget to sign up for the newsletter! Once a week, I send updates on quilt-related information I have found while wandering the web. This might be an inspiring article, a tip or tutorial I have discovered (or written), and occasionally exclusive offers & discounts as well as immediate access to the secret page of free patterns, guides, and printables. You can follow my page on Facebook, or join the Make Believe Quilters group, too.