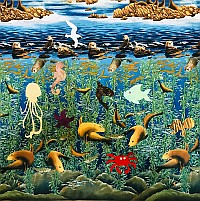
Octopus Garden

Ringo Starr said he named his song after the story that Octopuses strolled along the ocean floor gathering rocks and other pretty baubles to make a garden. Is the story true?

Indeed it is! Octopuses like to hide in small, protected areas. Sometimes they hide the opening to that area by piling up rocks, shells, broken glass, bottle caps, or anything their tube feet can move. This is called an Octopus Garden. Then they fold their body into the crevice, which is easy to do as they have no bones, and change both the color and texture of their body to match the surroundings.

I know you are humming right now!

Last year, I taught a 3rd-grade Zoom class on ocean animals for my grandson. I’ve included some of the videos and tutorials that I shared with him in this post. Here is my third-grade level tutorial on the octopus.

Pretty picture of two fish
Picture taken at the National Park Aquarium in Hot Springs, AR

To make your own Octopus Garden:

  • a 30″ x 30″ piece of watery fabric. If you have a sea panel or something with a large ocean print, that would be an excellent place to start your garden. The American Wildnerness “Monterey Bay” fabric by SSI that I am using is long out of print, but I did find some interesting panels at the Fat Quarter Shop.
  • a Pigma pen, colored fabric pencils, or embroidery needle and thread to add accents to your garden visitors. If you have tulle, maybe a round pearl button for the clam, other small buttons for eyes, or organza ribbons for embellishments, all the better.
  • Steam-a-Seam II Lite Fusible Web. I like this the best because it sticks when you put it in place but it’s not permanent until you hit it with a hot iron. Follow the manufacturer’s instructions.
  • An Applique pressing sheet.
  • Karen Kay Buckley Perfect 4″ scissors.

To use the motifs in this pattern, first print them out full size. Using a lightbox or a window, trace them on to the paper side of your fusible webbing. Remember that these motifs will be reversed when you actually use them.

Don’t try to be too precise in your tracing. These are animals that move through the water. They are always going to look a little different from each other. Cut the paper apart ROUGHLY. You will cut them apart precisely after they have been fused to fabric.

applique motifs on a light box

You don’t have to use all the motifs I have given you. If your fabric has fish or kelp (or yellow submarines), feel free to ignore those motifs. They are just for ideas. If you want to add or subtract an element from your design, no one will criticize you.

applique motifs on a light box
I am only using the bird from this sheet
YES! The Sea Life Medley by Accuquilt will work for this pattern!
Sea Life Die by Accuquilt.
To use this die with different colors, just place the prepared fabric on the die, cover it with the mat and run it through the machine.

Time to play!

Go through your stash or beg fabric from friends. Be sure to look at the wrong side of the fabric, too:-)) Try to match the feeling of the animal. Remember that Sea Stars are actually quite colorful. Look for brilliant blues or purples for them. Here is my tutorial on Sea Stars.

Starfish in a bowl
Picture taken at the The Florida Aquarium in Tampa FL
Starfish being examinied
Picture taken during a class at the Navarre Beach Marine Science Station

A batik or a leopard print might make a good sea turtle. Here is my tutorial for a third-grader.

Seaturtle swimming
Seaturtle

A seahorse is usually yellowish, but some species have zebra stripes. Here is a third-grade tutorial.

Here is my tutorial on Seahorses and SeaDragons.

Don’t overthink this. No matter what fabric you use, I can guarantee you that somewhere there is an animal that looks just like what you are creating.

Here are the motifs ready to be fused to the background fabric.

Prewash and press your fabric. Don’t use fabric softener or spray starch. Place the fusible web on your fabric, sticky fabric toward the side of the fabric you are not using, and rough-cut motif facing up. Place the Applique Pressing Sheet over the fusible and press the sheet. That helps keep the heat away from what you are working on, and the webbing away from your iron.

If you have never done fusible applique before or are using a new type of fusible webbing, try a test piece first. This is especially important if you are not using 100% cotton. If you would like to try a shiny polyester for a motif, I suggest you use Misty Fuse. That adheres in low temperatures.

More Animals for Inspiration

Here is my tutorial for third graders on dolphins

Do you think some of your animals would look more interesting if you stuffed them? You can do that! When you cut your fusible web, cut out the center. That way when you press it on to the fabric, there will be a section with no sticky stuff. Just before you place the motif-to-be-fused under the Applique pressing sheet, you can insert a little cotton ball or whatever you would like to stuff it with.

If you want to insert something larger – a squeaky toy maybe – do the same thing but skip the cotton ball. After you have fused the motif to the background, you will have to cut a teeny tiny hole in the background under the part of the motif that has no fusible. Insert the toy and hand stitch the opening.

sandy sea-jelly
Sea Jellies can be venomous so it’s not a good idea to pick one up, even when they are dead. Here is my third grade tutorial.

Now that you have your rough cut motif, it’s time to cut the edges. Here is where the Karen Kay Buckley scissors really shine. You will need to make tiny, precise cuts in a few places. If you run into trouble, remember what I said about variety in animals. You can always use your Pigma pen to add interest. The whale’s teeth, for example, or a smiling dolphin. Remove any stray threads.

Lay your background on your ironing board and place your motifs. Move them around until you like the design. Place the applique pressing sheet over the top and press your design. If something moves, or you decide you don’t like it after all, you can usually move a motif while it is still warm if you are using Steam-a-Seam Lite II.

If this is going to be a wall hanging, you don’t really have to finish the edges as you won’t be washing it that much. If you want to, though, you can always use the zig-zag stitch on your machine to secure the edges. This would be a nice piece to put on stretcher bars, but if you quilt it be sure to quilt in some bubbles and maybe a bit of froth.

Sharks do not normally attack people, despite what the movies would have you believe.
Here is my tutorial.

Don’t forget to make a label. You worked hard, you should get the credit for it.

This is not finished yet. My grandson and I are adding the finishing touches as his final exam.

Please add kris@scrapdash.com to your contacts list to make sure you get the confirmation message. Drag the confirmation message from the Promotion tab to the Primary tab if you use Gmail.

If you are already a subscriber, it’s okay to fill out this form. You won’t be put on the mailing list twice.

Have another tip to offer? Send it to me or reply below and I will add it here.

Don’t forget to sign up for the newsletter! Once a week, I send updates on quilt-related information I have found while wandering the web. This might be an inspiring article, a tip or tutorial I have discovered (or written), and occasionally exclusive offers & discounts as well as immediate access to the secret page of free patterns, guides, and printables. You can follow my page on Facebook, or join the Make Believe Quilters group, too.

Good night, Navarre Beach! I miss you!