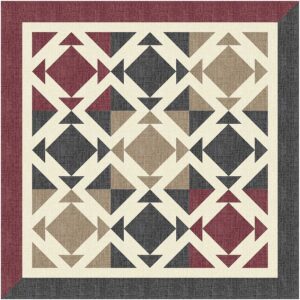
The theme of this months #QuiltBlockMania is “Drink”. I thought about all the possible meanings of the word, but decided to go with the traditional. Here is a block that makes a great tesselating mini quilt.
To visit the other designers in this hop, see the list at the bottom of the page. To print this page, use the green Print Friendly button at the bottom, just above the comments. If that doesn’t work, try pressing down the CNTRL button and the P button at the same time. Or the COMMAND button and the P button if you are on a Mac. That should bring up the printer dialog.
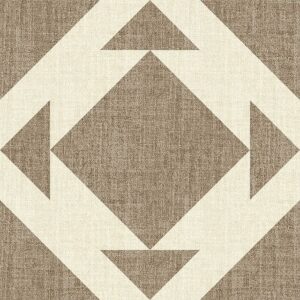
Looking for a Fat Quarter quilt?
You can make 3 of these blocks from just one 18″ x 21″ fat quarter. Well, two, actually. One for the color and one for the background.
Before starting this project, I recommend that you press your fabric with spray sizing. It will make it easier to cut small pieces. Take the time to clean your machine, put in a new needle, and fill a few bobbins. When pressing, just hold the iron over a spot for a moment or two. This pattern assumes a perfect 1/4” seam.
I am using the No Math/ Wing Clipper Method of making flying geese in this tutorial. Other methods are listed below. Cut for your preferred method.
- Traditional Method
- Accuquilt
- Quilt in a Day
- Dimensional
- Square-in-a-Square
- Corners on a triangle using the Ultimate Flying Geese Tool
Items you might like to have on hand are:
- a Lazy Girl NoMath ruler
- a small Quilt-in-a day Flying Geese Ruler or a Wing Clipper ruler
- a 4-1/2″, and a 12-1/2″ square ruler
- rotating cutting board
- sharp pins (applique or patchwork)
- Best Press
- a Walking Foot
To make a single block, cut your colored fat quarter into:
- (2) 5-1/4″ squares
- (2) 5″ squares
- (1) 4-1/2″ square
Cut your background fat quarter into:
- (8) 2-7/8″ squares
- (2) 5″ squares
Making the Flying Geese Blocks
You might remember this tutorial from the Key West mystery:-))
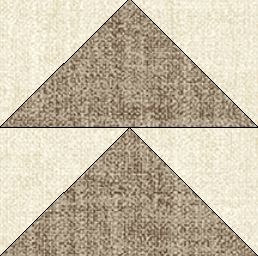
This is the “No Math” method of making four Flying Goose blocks at a time. The Lazy Girl No Math ruler can be used for these. This ruler has lines corresponding to different size flying goose blocks. The size we are making is size F.
I recommend making a practice block. When I made mine, I discovered that a scant 1/4″seam worked better for me than a full 1/4″ seam.
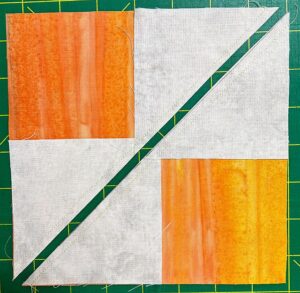
To make a practice block, lay two 2-7/8″ background squares face down on a 5-1/4″ colored square at opposite corners. The two squares will overlap each other slightly in the center as shown. Draw a line on the diagonal and sew 1/4″ on either side of the diagonal.
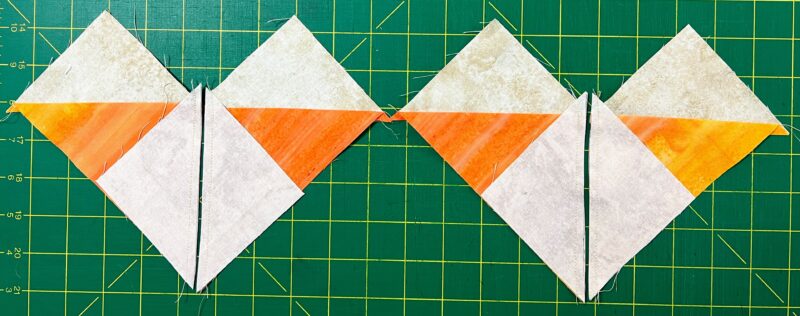
Cut these apart on the diagonal line. Press toward the cut squares, making two blocks which look like a heart. Press toward the heart points.
Place another 2-7/8″ background square face down on the heart with the point overlapping the middle. Draw a line on the diagonal and sew 1/4″ on either side of the diagonal.
Cut this apart, press to the heart again, and you have two flying geese units per heart that should require no trimming except to cut off the dog ears.
Square these up to 2-1/2″ × 4-1/2″ if necessary. If you have a small Quilt-in-a-Day flying goose ruler or a Wing Clipper ruler, it will helpful here, as will a rotating cutting mat.
Two hearts will make four flying geese blocks.
Do you like this method and would like to use it in other sizes? You need our handy-dandy No Math/No Waste Flying Goose chart! You can sign up for the newsletter and receive this chart free by filing in the form at the bottom of the page.
Using the above method, make (8) flying geese blocks. Sew them two at a time to make (4) 4-1/2″ blocks. Press and square up if necessary.
How to Create and Square Up a Half Square Triangle (HST) Quilt Block
The Traditional Method of making Half Square Triangle Blocks (HSTs) is to place two identical squares right sides together. These squares should be 7/8″ larger than the finished size of the final HST. Draw a diagonal line on the back of one square. Sew 1/4″ on both sides of the line. Cut on the line and press to the dark.

You will have made two identical Half Square Triangle (HST) blocks. My personal preference is to cut squares 1″ larger than the finished size of the final HST and square it up to the correct size after pressing.
There are two ways you can square up your block.
You can place a square ruler so the diagonal line is directly over the seam and just cut two sides. Quilt-in-a-Day has a Square Up Ruler that uses this method.
Or you can press open the block (pressing to the dark) and square it up using a ruler the same size as the block you are making. A fussy-cut ruler with lines on both diagonals will be very helpful with this.
You only need (4) HSTs for this block. Following the directions above, make these using the (2) 5″ Colored squares and the (2) 5″ Background squares. Press to the dark and square up to 4-1/2″.
Put it all Together!
Assemble:
- (4) Flying Geese blocks
- (4) 4-1/2″ HSTs
- (1) 4-1/2″ Colored block
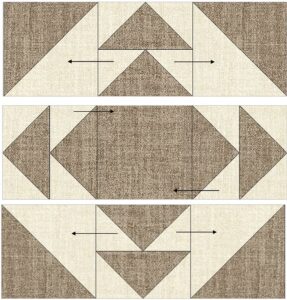
This block is sewn like a nine-patch. First sew the top and bottom rows, pressing the seams to the HSTs. Then sew the middle row, pressing the seams to the center. Arrange as shown below, then sew the rows into a final block. Press from the back so you can fix any twisted seams, then square up to 12-1/2″ if necessary.
What can you do with this block?
Here is my sample, courtesy of Electric Quilt. I call it “Coffee or Tea?” This digital pattern is available on Etsy.
Please add moc.hsadparcs@sirk to your contacts list to make sure you get the confirmation message. Drag the confirmation message from the Promotion tab to the Primary tab if you use Gmail.
If you are already a subscriber, it’s okay to fill out this form. You won’t be put on the mailing list twice.
Have another tip to offer? Send it to me or reply below and I will add it here.
Don’t forget to sign up for the newsletter! Once a week, I send updates on quilt-related information I have found while wandering the web. This might be an inspiring article, a tip or tutorial I have discovered (or written), and occasionally exclusive offers & discounts as well as immediate access to the secret page of free patterns, guides, and printables. You can follow my page on Facebook, or join the Make Believe Quilters group, too.
Be Sure to Visit These Designers Too!
- Champagne Quilt Block by Carolina Moore
- Martini by Crafty Staci
- You Shake Me Up
- Scrappy Mug by Katie Mae Quilts
- Pina Colada by Appliques Quilts and More
- Cosmopolitan by Inquiring Quilter
- Cups and Saucers
- Beer Pong by Patti’s Patchwork
- Perfect Flying Geese
- Bear Loves Cocoa by Colette Belt Designs
- Coffee Bean by Sewistry
- Sip & Stitch by Happy Hour Stitches
- I’m a LIttle Teapot
- Bit too Much by Epida Studio
- Tupperware Pitcher by Cristy Fincher
- Ice Cubes by Create with Claudia
- French Press by Oh Kaye Quilting
- Sew Fresh FPP Block by San Diego Sewn
- Cheerwine by Emerald Falls Quilts
- Iced Lemonade by Patchwork Breeze



Thank you for your generosity – the free block patterns are appreciated. I particularly like that you provide a sample mock up of how the block looks in a quilt.
Thank you! I actually decided to make this one mini-quilt. Sometimes there is not enough time, but this one is cute!